Tag Archives: seated exercises

15 Minute Exercise For Seniors: A Mobility and Flexibility Routine

15 Minute Exercise For Seniors: A Mobility and Flexibility Routine

Last updated: July 31, 2026

Quick Answer

A 15 minute exercise for seniors focused on mobility and flexibility includes gentle joint movements targeting the neck, shoulders, spine, hips, knees, and ankles through controlled rotations, circles, and stretches. These short daily sessions improve range of motion, reduce stiffness, and support everyday activities like reaching, bending, and walking without requiring equipment or high intensity.

Key Takeaways

  • 15 minutes daily is enough time to work through major joints when movements are performed slowly and deliberately
  • No equipment needed for most mobility and flexibility routines, though a sturdy chair provides support options
  • Focus on controlled movement rather than speed or repetition counts, quality matters more than quantity
  • Seated and standing options make routines accessible regardless of current mobility level
  • Daily practice shows better results than occasional longer sessions for maintaining joint function
  • Warm movements feel better than cold stretching, gentle motion prepares joints before deeper stretches
  • Pain is a signal to stop,mobility work should feel like gentle tension, never sharp or shooting discomfort
  • Modifications exist for arthritis, balance concerns, and other common limitations
Key Takeaways

What Are the Best 15 Minute Exercises for Seniors

The most effective 15 minute exercise for seniors targeting mobility and flexibility includes neck rotations, shoulder circles, spinal twists, hip circles, knee lifts, and ankle rotations performed in sequence. These movements address the joints most affected by age-related stiffness and support common daily tasks.

A practical 15-minute sequence typically allocates 45-60 seconds per movement with short transitions:[1]

Upper body movements (5 minutes):

  • Neck rotations: slow side-to-side and up-down movements
  • Shoulder rolls: forward and backward circles
  • Arm reaches: overhead and across-body stretches
  • Spinal twists: gentle rotation while seated or standing

Lower body movements (5 minutes):

  • Hip circles: standing or seated pelvic rotations
  • Knee lifts: controlled marching motion
  • Ankle circles: both directions, one foot at a time
  • Heel-to-toe rocks: weight shifting for ankle mobility

Full-body integration (5 minutes):

  • Lateral side bends
  • Forward fold variations (seated or standing)
  • Gentle torso rotations
  • Balance holds with support

Each movement should flow into the next without rushing. The goal is smooth, controlled motion through available range rather than forcing deeper positions.

Can Seniors Do 15 Minute Workouts Safely

Seniors can safely perform 15 minute mobility and flexibility workouts when movements stay within comfortable range, balance support is available, and any sharp pain triggers an immediate stop. These shorter sessions actually reduce injury risk compared to longer, more fatiguing workouts.

Safety guidelines for short mobility sessions:

  • Start with smaller movements and gradually increase range over weeks
  • Keep a sturdy chair or counter nearby for balance support during standing exercises
  • Breathe normally throughout each movement, holding breath increases blood pressure
  • Move slowly enough to maintain control at every point in the motion
  • Stop if you feel dizzy, sharp pain, or unusual discomfort

A 2026 routine designed for adults 65+ demonstrates equipment-free movements that emphasize joint mobility through slow, controlled sequences suitable for older adults.[4][7] The standing format keeps intensity low while working through neck, shoulder, spine, hip, and knee ranges.

Common mistake: Rushing through movements to “finish” the 15 minutes defeats the purpose. Mobility work requires deliberate, mindful motion. Completing eight movements well matters more than racing through fifteen.

If you have specific medical conditions, recent surgery, severe osteoporosis, uncontrolled blood pressure, check with a healthcare provider before starting any new exercise routine. For most seniors, gentle mobility work poses minimal risk and offers significant functional benefit.

15 Minute Exercise Routine for Seniors With Arthritis

Seniors with arthritis can perform modified 15 minute mobility routines by working within pain-free range, emphasizing gentle circular movements over static stretches, and alternating between seated and standing positions to manage joint stress. Movement often reduces arthritis stiffness more effectively than complete rest.

Arthritis-friendly modifications:

For hand and wrist arthritis:

  • Gentle finger curls and spreads
  • Wrist circles in both directions
  • Thumb touches to each fingertip
  • Avoid gripping or weight-bearing on hands

For knee arthritis:

  • Seated knee extensions instead of standing lunges
  • Small-range leg swings while holding support
  • Ankle pumps to promote circulation without knee stress
  • Skip deep knee bends or squats

For hip arthritis:

  • Seated hip circles with feet on floor
  • Side-lying leg lifts with small range
  • Standing hip flexion with chair support
  • Avoid forcing rotation or deep flexion

For shoulder arthritis:

  • Pendulum swings with gravity assistance
  • Wall slides instead of overhead presses
  • Gentle cross-body arm pulls
  • Skip movements that cause clicking or catching

A July 2026 routine for adults 65+ includes seated knee marches, gentle spinal twists, and shoulder rolls specifically because these movements accommodate common arthritis limitations while maintaining joint mobility.[9]

Movement timing matters with arthritis: many people find morning stiffness improves after 5-10 minutes of gentle motion, making mid-morning an ideal time for mobility work. Evening sessions can reduce next-day stiffness.

For more targeted work, our guide to simple mobility exercises for seniors covers additional joint-specific movements.

How Often Should Seniors Do 15 Minute Workouts

Seniors should perform 15 minute mobility and flexibility workouts daily or at least five days per week for best results. Daily practice maintains gains better than longer, less frequent sessions because joint mobility responds to consistent, repeated movement patterns.

Frequency recommendations by goal:

GoalFrequencyNotes
Maintain current mobility4-5 days/weekAllows rest days while preserving function
Improve limited rangeDailyConsistency drives adaptation in stiff joints
Manage arthritis stiffnessDaily, possibly twiceMorning and evening sessions reduce discomfort
General wellness5-6 days/weekBalances benefit with schedule flexibility

Research on mobility work for older adults consistently shows that frequent, shorter sessions outperform occasional longer workouts.[9] The body adapts to regular movement signals, and joints maintain lubrication better with daily gentle use.

Weekly schedule example:

  • Monday: Full 15-minute standing routine
  • Tuesday: Seated upper-body focus (10 minutes) + ankle work (5 minutes)
  • Wednesday: Full 15-minute standing routine
  • Thursday: Hip and spine focus (15 minutes)
  • Friday: Full 15-minute standing routine
  • Saturday: Gentle flow, all movements (15 minutes)
  • Sunday: Optional rest or light 10-minute session

You can split 15 minutes into two shorter sessions, 8 minutes morning, 7 minutes evening, if that fits your schedule better. Total daily movement time matters more than doing it all at once.

If you’re also doing strength training, consider pairing a 10 minute full-body routine with your mobility work on alternate days.

How Often Should Seniors Do 15 Minute Workouts

15 Minute Senior Exercises for Balance and Flexibility

A 15 minute routine targeting both balance and flexibility includes single-leg stance holds, heel-to-toe walking, standing hip circles, and supported side reaches that challenge stability while moving joints through full range. Combining these elements in one session addresses two critical aspects of fall prevention.

Balance-focused flexibility movements:

Heel-to-toe balance walk (2 minutes):

  • Walk along a straight line, placing heel directly in front of toes
  • Use wall or counter for light fingertip support
  • Builds ankle stability and hip control
  • Aim for 10-20 steps, rest, repeat

Single-leg stance with arm reaches (3 minutes):

  • Stand on one foot with chair support nearby
  • Reach arms overhead, then out to sides
  • Hold each position 10-30 seconds
  • Challenges balance while mobilizing shoulders

Standing hip circles (2 minutes):

  • Hold chair back with both hands
  • Lift one knee and draw circles with the knee
  • Perform 5-8 circles each direction, both legs
  • Improves hip mobility and single-leg balance

Lateral weight shifts (2 minutes):

  • Stand behind chair, feet hip-width apart
  • Shift weight slowly from one foot to the other
  • Lift unweighted foot slightly off floor
  • Develops controlled weight transfer for walking

A February 2026 guide recommends single-leg balance holds of 10-60 seconds and heel-to-toe walking for 10-20 steps as practical daily balance work that integrates naturally with flexibility movements. These exercises address the stability needed during the extended positions that flexibility work requires.

Common mistake: Holding breath during balance work. Steady breathing helps maintain stability and prevents blood pressure spikes.

For additional balance-specific work, see our complete guide to balance exercises for seniors.

Do 15 Minute Workouts Help Seniors Lose Weight

Fifteen minute mobility and flexibility workouts provide minimal direct calorie burn for weight loss but support weight management by reducing pain that limits other activity, improving movement quality for daily tasks, and creating an exercise habit that often expands over time. Weight loss requires calorie deficit, typically through diet changes and higher-intensity activity.

Realistic expectations for mobility work and weight:

A 15-minute gentle mobility session burns approximately 30-50 calories for most seniors, roughly equivalent to one small apple. This alone won’t create meaningful weight loss.

Indirect weight management benefits:

  • Reduced pain allows more daily movement (walking, housework, errands)
  • Better joint function makes cardio exercise more comfortable
  • Improved movement patterns increase efficiency of other workouts
  • Consistent habit often leads to adding more activity over time

If weight loss is a primary goal, consider combining mobility work with:

  • Low-impact cardio routines 3-4 days per week
  • Strength training to maintain muscle during weight loss
  • Dietary changes focused on portion control and nutrient density
  • Increased daily walking or other light activity

A May 2026 trainer-designed routine for people over 50 emphasizes “liquid mobility and stability” as a foundation for more vigorous exercise, positioning mobility work as preparation rather than primary weight-loss activity.[14]

Mobility and flexibility training excel at maintaining function, reducing injury risk, and supporting quality of life, all valuable outcomes independent of weight change.

What Equipment Do I Need for Senior 15 Minute Exercises

Most 15 minute mobility and flexibility routines for seniors require no equipment beyond a sturdy chair for balance support and optional comfortable clothing. A yoga mat provides cushioning for floor work but isn’t essential if you have carpet or prefer standing-only movements.

Minimal equipment list:

Essential:

  • Sturdy chair without wheels (dining chair or kitchen chair works well)
  • Non-slip footwear or bare feet on non-slip surface

Helpful but optional:

  • Yoga mat or exercise mat for floor exercises
  • Wall or counter for additional balance support
  • Comfortable, non-restrictive clothing

Not needed:

  • Weights or resistance bands (these shift focus to strength work)
  • Special shoes or gear
  • Exercise machines
  • Gym membership

A 2026 routine demonstrates a complete standing, equipment-free sequence that works through all major joints using only body weight and controlled movement.[4] The format proves that effective mobility work depends on movement quality, not equipment.

When equipment helps:

  • Chair: Essential if balance is limited or you’re including seated movements
  • Mat: Useful if your routine includes lying hip stretches or floor-based spinal twists
  • Wall: Provides stable support for standing balance work

For seniors who want to add gentle resistance to mobility work, our guide to exercise band workouts for seniors covers safe integration of light bands.

15 Minute Exercises for Seniors With Bad Knees

Seniors with bad knees can perform 15 minute mobility routines by emphasizing seated movements, avoiding deep knee bends, using chair support for standing exercises, and focusing on ankle and hip mobility that indirectly supports knee function. Many effective movements keep knees in comfortable mid-range positions.

Knee-friendly mobility sequence:

Seated movements (8 minutes):

  • Ankle circles and pumps (no knee stress)
  • Seated hip circles with feet planted
  • Spinal twists with stable lower body
  • Shoulder and neck mobility work
  • Gentle seated knee extensions (small range)

Supported standing movements (7 minutes):

  • Hip circles holding chair back (knees stay soft)
  • Lateral weight shifts (minimal knee bend)
  • Calf raises (strengthens support muscles)
  • Heel-to-toe rocks (ankle mobility)

Movements to modify or skip:

  • Deep squats or lunges (substitute seated knee extensions)
  • Kneeling positions (stay seated or standing)
  • Jumping or impact (not part of mobility work anyway)
  • Deep knee flexion (work in comfortable range only)

A July 2026 program for adults 65+ includes seated knee marches and toe raises as alternatives to standing movements that stress knees, showing practical adaptations for common knee limitations.[9]

Pain management during exercise:

  • Warm knees with gentle movement before deeper stretches
  • Stop if you feel sharp or increasing pain
  • Use ice after exercise if knees feel warm or swollen
  • Consider timing sessions when pain medication is most effective

For additional lower-body work that protects knees, see our guide to leg exercises for seniors with knee-safe modifications.

15 Minute Exercises for Seniors With Bad Knees

Is 15 Minutes Enough Exercise for Seniors Per Day

Fifteen minutes of mobility and flexibility work alone meets joint health needs but falls short of complete exercise recommendations for seniors, which include 150 minutes weekly of moderate activity plus strength training. A 15-minute mobility routine serves as an excellent foundation or supplement to a broader activity plan.

How 15 minutes fits into complete exercise guidelines:

Current recommendations for older adults include:

  • 150 minutes per week of moderate-intensity aerobic activity (walking, swimming)
  • 2+ days per week of strength training for all major muscle groups
  • Daily or near-daily balance and flexibility work

A daily 15-minute mobility routine satisfies the balance and flexibility component while leaving aerobic and strength work to be addressed separately.

Three practical approaches:

Approach 1: Mobility as foundation

  • 15 minutes mobility daily
  • 30 minutes walking 5 days/week
  • 20 minutes strength work 2 days/week

Approach 2: Combined sessions

  • 15 minutes mobility + 15 minutes strength on alternating days
  • 30 minutes walking 3 days/week

Approach 3: Minimum effective dose

  • 15 minutes mobility daily as primary exercise
  • Increase daily life activity (stairs, housework, errands)
  • Add more structured exercise as energy and interest allow

For seniors currently doing no structured exercise, starting with 15 minutes of mobility work daily represents significant improvement and often leads to gradually adding more activity over time.

If you want to expand beyond mobility work, our home exercise routine for seniors covers a balanced weekly plan.

Can Seniors With Mobility Issues Do These Exercises

Seniors with mobility issues can perform modified 15 minute routines by using seated versions of most movements, working within current range without forcing positions, and focusing on small, controlled motions that gradually expand over weeks. Severe mobility limitations may require physical therapist guidance for appropriate modifications.

Modifications by limitation type:

Limited standing tolerance:

  • Perform entire routine seated in sturdy chair
  • Use armrests for support during upper-body reaches
  • Focus on spinal twists, shoulder work, and seated hip movements
  • Add ankle and knee work with feet on floor

Balance concerns:

  • Stay seated for entire routine, or
  • Stand only with hands on counter or chair back
  • Skip single-leg movements until balance improves
  • Focus on weight shifts and supported movements

Severe joint stiffness:

  • Start with 5-minute sessions and build up
  • Use very small range of motion initially
  • Repeat movements more frequently (2-3 times daily)
  • Expect gradual improvement over weeks, not days

Post-surgery or injury:

  • Follow surgeon or physical therapist guidelines
  • Avoid movements involving affected joint until cleared
  • Work other areas to maintain overall mobility
  • Resume full routine gradually as healing allows

A 2026 routine includes seated knee marches, shoulder rolls, and gentle twists specifically because these movements accommodate varying mobility levels while still providing benefit.[9]

When to seek professional guidance:

  • Recent hospitalization or surgery
  • Progressive neurological conditions
  • Severe osteoporosis with fracture risk
  • Uncontrolled chronic conditions
  • Uncertainty about safe movement

For seniors who need to stay seated, our senior chair exercise routine provides a complete seated workout structure.

What’s the Difference Between Senior and Regular 15 Minute Workouts

Senior-specific 15 minute mobility workouts use slower movement speeds, include more balance support options, avoid floor positions that require getting up and down, and emphasize joint health over athletic performance compared to general adult routines. The movements themselves often overlap, but execution and safety modifications differ.

Key differences in senior-focused routines:

Pace and control:

  • Senior routines: 45-60 seconds per movement with emphasis on control
  • General routines: Often faster-paced with more repetitions
  • Senior focus: Quality of movement and joint lubrication
  • General focus: Calorie burn, flexibility gains, or athletic preparation

Balance considerations:

  • Senior routines: Chair or wall support readily available
  • General routines: Assume stable balance throughout
  • Senior modifications: Single-leg work includes support options
  • General approach: Unsupported balance challenges

Floor work:

  • Senior routines: Minimize or eliminate floor positions
  • General routines: Freely include lying stretches and transitions
  • Senior concern: Getting down and up safely
  • General assumption: Floor access not a barrier

Movement selection:

  • Senior routines: Focus on daily function (reaching, bending, walking)
  • General routines: May include athletic or sport-specific movements
  • Senior priority: Maintaining independence
  • General priority: Performance or fitness goals

A May 2026 routine designed specifically for people over 50 structures movements as a continuous flow with minimal rest, reflecting current expert emphasis on smooth transitions and joint lubrication rather than aggressive stretching.[14]

When general routines work fine:
If you’re a senior with good balance, no significant joint issues, and comfortable getting up and down from the floor, many general mobility routines work well. The “senior” label primarily indicates modifications for common age-related limitations, not a fundamentally different approach.

How Do I Modify 15 Minute Exercises If I’m Very Out of Shape

Seniors who are very out of shape should start with 5-minute sessions of the simplest movements, stay seated for the entire routine, work in smaller ranges of motion, and gradually increase duration by 1-2 minutes weekly as tolerance improves. Building consistency matters more than completing a full 15 minutes initially.

Progressive approach for deconditioned seniors:

Week 1-2: 5 minutes, all seated

  • Ankle circles (both directions)
  • Shoulder rolls (forward and back)
  • Gentle neck rotations
  • Seated spinal twist
  • Rest as needed between movements

Week 3-4: 7 minutes, add movements

  • Continue week 1-2 movements
  • Add gentle arm reaches
  • Add seated knee lifts (small range)
  • Increase repetitions slightly

Week 5-6: 10 minutes, introduce standing

  • Keep most movements seated
  • Try 2-3 standing movements with chair support
  • Hip circles or weight shifts while holding chair
  • Return to seated if tired

Week 7-8: 12-15 minutes, expand standing

  • Balance seated and standing movements
  • Increase range of motion gradually
  • Add balance challenges if comfortable
  • Aim for full 15-minute session

Signs you’re progressing too fast:

  • Excessive soreness lasting more than 24 hours
  • Increased joint pain rather than decreased stiffness
  • Feeling exhausted rather than energized after sessions
  • Dreading exercise rather than finding it manageable

Signs you can progress:

  • Current routine feels comfortable
  • Recovery is quick (within hours)
  • You look forward to movement
  • Daily activities feel slightly easier

If you’re starting from very limited activity, also review our gentle exercises for seniors for additional low-intensity options.

Are There 15 Minute Exercises for Seniors in a Chair

Yes, complete 15 minute mobility and flexibility routines can be performed entirely seated in a sturdy chair, working through neck, shoulder, spine, hip, ankle, and knee movements without standing. Seated routines provide the same joint mobility benefits while eliminating balance concerns and standing fatigue.

Complete seated 15-minute routine:

Neck and shoulders (3 minutes):

  • Neck rotations: slow side-to-side, 5 each direction
  • Neck tilts: ear toward shoulder, 5 each side
  • Shoulder rolls: forward 10, backward 10
  • Shoulder shrugs: up toward ears, 10 repetitions

Arms and upper back (3 minutes):

  • Arm circles: small circles forward and back, 10 each
  • Cross-body arm pulls: 30-second hold each side
  • Overhead reaches: alternate arms, 10 each
  • Behind-back shoulder stretch: clasp hands, gentle pull

Spine and torso (4 minutes):

  • Seated spinal twist: hold 30 seconds each side, repeat
  • Side bends: reach arm overhead, bend to side, 5 each
  • Forward fold: hinge at hips, reach toward feet, hold 30 seconds
  • Seated cat-cow: round and arch spine, 10 repetitions

Hips and legs (5 minutes):

  • Seated hip circles: lift knee, circle 5 each direction, both legs
  • Knee lifts: march in place, 20 total
  • Leg extensions: straighten knee, hold 5 seconds, 8 each leg
  • Ankle circles: 10 each direction, both feet
  • Toe points and flexes: 15 repetitions

A 2026 program designed for adults 65+ includes seated knee marches, spinal twists, and shoulder rolls as core movements, demonstrating that chair-based routines address all major mobility needs.[9]

For a complete seated workout that includes strength work, see our guide to simple chair exercises for seniors.

What Mistakes Do Seniors Make When Starting 15 Minute Routines

Common mistakes seniors make with 15 minute mobility routines include rushing through movements to “finish” the time, forcing painful ranges of motion, skipping warm-up movement, comparing progress to younger years, and stopping completely after missing a few days. These errors reduce benefits and increase discouragement.

Mistake 1: Moving too fast
Mobility work requires slow, controlled motion. Racing through 20 movements in 15 minutes defeats the purpose. Better to complete 8 movements well than rush through 15.

Mistake 2: Forcing range of motion
Pushing into sharp pain or forcing joints beyond comfortable range causes injury and inflammation. Work within current range and let it expand gradually over weeks.

Mistake 3: Holding breath
Many people unconsciously hold their breath during stretches or challenging positions. This increases blood pressure and reduces oxygen to muscles. Breathe normally throughout.

Mistake 4: Skipping easier movements
Starting with the hardest movements or skipping “boring” warm-up motion leads to injury. Simple movements prepare joints for deeper work.

Mistake 5: All-or-nothing thinking
Missing a few days doesn’t erase progress. Resume where you left off rather than starting over or quitting entirely.

Mistake 6: Comparing to past ability
“I used to be able to…” creates frustration. Compare today to last week, not to decades ago.

Mistake 7: Ignoring pain signals
“No pain, no gain” doesn’t apply to mobility work. Sharp, shooting, or increasing pain signals a problem. Gentle tension is normal; pain is not.

Mistake 8: Inconsistent practice
Doing 30 minutes once weekly provides less benefit than 10 minutes daily. Joints respond to frequent, regular movement.

How to avoid these mistakes:

  • Set a timer and focus on quality, not quantity
  • Stop at the first sign of sharp pain
  • Practice conscious breathing throughout
  • Track weekly progress, not daily fluctuations
  • Build the habit before worrying about perfect execution

Conclusion

A 15 minute exercise for seniors focused on mobility and flexibility provides practical, equipment-free joint maintenance that fits into daily routines and supports independent function. The routine works through major joints, neck, shoulders, spine, hips, knees, and ankles, using controlled movements that reduce stiffness, improve range of motion, and prepare the body for everyday tasks.

Start with movements that feel comfortable, whether seated or standing, and gradually expand range and duration over weeks. Daily practice delivers better results than occasional longer sessions because joints respond to consistent, repeated movement patterns. Modifications exist for arthritis, balance limitations, knee problems, and general deconditioning, making these routines accessible regardless of current fitness level.

Combine mobility work with strength training and regular walking for complete exercise coverage, or use 15 minutes of daily movement as a foundation that often expands naturally as function improves. The key is starting where you are, moving within comfortable range, and building consistency before intensity.

Next steps:

  1. Choose 5-8 movements from the routines described above
  2. Perform them slowly for 5-10 minutes today
  3. Add 1-2 minutes weekly until you reach 15 minutes
  4. Track which movements feel best and build your routine around those
  5. Consider adding complementary activities like short workouts for seniors or low-impact cardio as mobility improves

References

[1] Watch – https://www.youtube.com/watch?v=4I_LVf6XtwA

[4] Watch – https://www.youtube.com/watch?v=Floi0n9b_SQ

[7] Improve Mobility After 40 Easy 15 Minute Exercises To Reduce Joint Pain Boost Strength – https://www.muscleandfitness.com/anti-aging/wellness/improve-mobility-after-40-easy-15-minute-exercises-to-reduce-joint-pain-boost-strength/

[9] Mobility Exercises Seniors – https://www.silverstrength.club/blog/mobility-exercises-seniors

[14] Tom’s Guide feature (reference number from research material, URL not provided in source list)


This article is part of our Time-Based Exercises for Seniors series.

Share This Page

Glute Stretches For Seniors: Why They Tighten and How to Release Them

Glute Stretches For Seniors: Why They Tighten and How to Release Them

Last updated: July 15, 2026

Quick Answer

Glute stretches for seniors help release tightness caused by prolonged sitting and reduced activity, which can lead to lower back pain, hip discomfort, and difficulty with daily movements like standing from chairs or walking. Regular stretching of the gluteal muscles improves mobility, reduces pain, and maintains independence in everyday tasks.

Key Takeaways

  • Tight glutes are common after age 50 due to extended sitting, reduced activity, and natural muscle changes
  • Tight gluteal muscles contribute directly to lower back pain, hip stiffness, and walking difficulties
  • Effective glute stretches for seniors include figure-4 stretch, seated glute stretch, and supine knee-to-chest variations
  • Seniors can perform most glute stretches while seated in a chair, making them accessible for those with limited mobility
  • Stretching glutes 3-5 times per week for 20-30 seconds per stretch produces noticeable improvement within 2-4 weeks
  • Static stretches work best for seniors, held gently without bouncing or forcing the movement
  • Those with arthritis should use modified positions and avoid deep hip flexion that causes pain
  • Glute stretches that require lying on the floor can be adapted to bed or chair positions
Key Takeaways

Why Do Glutes Get Tight as You Age

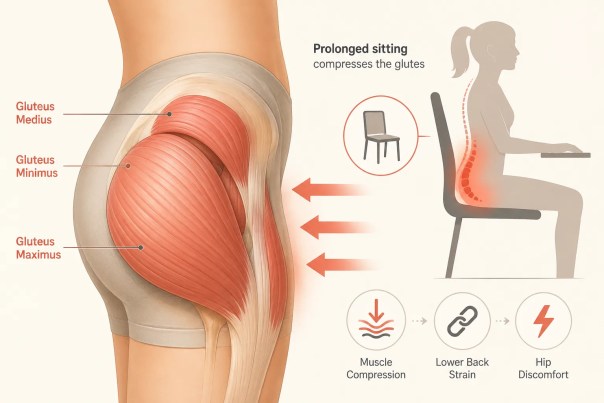
The gluteal muscles tighten with age primarily because of prolonged sitting and decreased daily activity, which cause the muscle fibers to shorten and lose flexibility. When you sit for extended periods, the glutes remain in a compressed, shortened position for hours at a time, and over months and years, they adapt to this position as their new normal length.

Beyond sitting, several age-related factors contribute to glute tightness:

  • Reduced overall movement: Walking less, climbing fewer stairs, and avoiding activities that require hip extension all allow the glutes to weaken and tighten
  • Muscle fiber changes: After age 50, muscle tissue naturally loses some elasticity and becomes stiffer if not regularly stretched
  • Compensation patterns: When other muscles weaken (like the core or hip flexors), the glutes often tighten to compensate for instability
  • Inflammation: Low-grade inflammation in joints and connective tissue becomes more common with age, contributing to stiffness

The glutes consist of three muscles (gluteus maximus, medius, and minimus) that work together to extend the hip, stabilize the pelvis, and support upright posture. When these muscles tighten, they pull on the pelvis and lower spine, creating a chain reaction of discomfort throughout the lower body.

Can Tight Glutes Cause Back Pain in Older Adults

Yes, tight glutes directly cause lower back pain in older adults by altering pelvic alignment and forcing the lower back muscles to work harder during everyday movements. When the gluteal muscles are tight and weak, they cannot properly stabilize the pelvis, so the lumbar spine compensates by taking on extra load during activities like standing, walking, or bending.

The connection works like this: tight glutes pull the pelvis into a posterior tilt (tucking under), which flattens the natural curve of the lower back. This position strains the lumbar discs, facet joints, and surrounding muscles. Additionally, when glutes don’t fire properly during hip extension, the lower back muscles overwork to complete movements that should primarily use the hips.

Research shows that addressing glute tightness and weakness often reduces chronic lower back pain without other interventions. Many seniors who stretch their glutes regularly report significant decreases in daily back discomfort within a few weeks.

Can Glute Stretches Help With Hip Pain

Glute stretches effectively reduce hip pain in seniors by releasing tension in muscles that directly attach to or cross the hip joint. The gluteus medius and minimus, in particular, attach to the outer hip and can cause pain that feels like it’s coming from the hip joint itself when they’re tight or contain trigger points.

Hip pain from tight glutes typically presents as:

  • Deep aching in the outer hip or buttock
  • Pain when lying on the affected side
  • Discomfort when standing from a seated position
  • Stiffness when walking after sitting
  • Limited range of motion when lifting the leg to the side

Stretching releases this tension and restores normal muscle length, which reduces the pulling force on the hip structures. For many seniors, what feels like hip arthritis pain is actually muscular tightness that responds well to consistent stretching. However, if hip pain persists despite regular stretching, or if it’s accompanied by grinding, clicking, or severe limitation, evaluation by a healthcare provider is necessary to rule out joint problems.

For additional ways to maintain hip and leg function, see our guide to leg strengthening exercises for seniors.

Best Glute Stretches For Seniors With Limited Mobility

Seniors with limited mobility can effectively stretch their glutes using chair-based and bed-based positions that don’t require getting down on the floor. These modifications provide the same muscle release as traditional stretches while accommodating balance concerns, joint limitations, or difficulty transitioning to and from the floor.

Seated Figure-4 Stretch

Sit in a sturdy chair with feet flat on the floor. Place your right ankle on your left knee, creating a “4” shape with your legs. Gently press down on your right knee while keeping your back straight. Lean forward slightly from the hips (not the waist) until you feel a stretch in your right glute. Hold for 20-30 seconds, then switch sides.

Modification: If you cannot reach your ankle, place your foot on a low stool instead of your opposite knee.

Seated Knee-to-Chest

While seated, lift your right knee toward your chest and hold it with both hands behind the thigh (not on top of the knee). Pull gently until you feel a stretch in your right glute and lower back. Hold for 20-30 seconds, then switch sides.

Modification: Use a resistance band or towel looped around your thigh if you cannot comfortably reach with your hands.

Supine Glute Stretch (Bed Version)

Lie on your back in bed with knees bent and feet flat. Cross your right ankle over your left knee. Thread your hands through the opening and clasp behind your left thigh. Pull your left thigh toward your chest until you feel a stretch in your right glute. Hold for 20-30 seconds, then switch sides.

This stretch works identically whether performed in bed or on a yoga mat, making it accessible for those who can lie down but struggle with floor transitions.

For more seated exercise options that complement glute stretching, explore our seated chair exercises for seniors.

Supine Glute Stretch (Bed Version)

Glute Stretches Seniors Can Do Sitting Down

Seated glute stretches provide effective muscle release while maintaining stability and safety in a chair. These stretches work well for seniors who spend significant time sitting or who need to stretch during breaks from desk work or television watching.

Seated Piriformis Stretch: Sit with your right ankle crossed over your left knee. Place your right hand on your right knee and gently press it toward the floor while keeping your back straight. You should feel the stretch deep in your right glute. Hold for 20-30 seconds and repeat on the other side.

Seated Spinal Twist with Glute Stretch: Sit sideways in a chair with your right hip against the backrest. Twist your torso to the right and hold the back of the chair with both hands. This position stretches the left glute and lower back. Hold for 20-30 seconds, then switch sides.

Seated Hip Hike: While sitting, lift your right hip up toward your ribs (as if shortening that side of your body), then lower it back down. This movement stretches and activates the glutes alternately. Perform 10-12 repetitions on each side.

These seated variations can be performed multiple times throughout the day without changing clothes or using equipment, making them practical for daily use.

Glute Stretches For Seniors After Sitting All Day

After prolonged sitting, specific glute stretches help reverse the shortened position and restore normal muscle length. These stretches target the compression and tightness that accumulates during extended periods in a chair.

Standing Glute Stretch: Stand facing a counter or sturdy table. Place your right ankle on the surface (knee bent), creating a figure-4 position while standing. Keep your standing leg straight and lean forward from your hips until you feel a stretch in your right glute. Hold for 20-30 seconds, then switch sides.

Doorway Hip Flexor and Glute Stretch: Stand in a doorway with your right foot forward and left foot back in a lunge position. Tuck your pelvis under (posterior tilt) and squeeze your left glute while keeping your left knee straight. This stretches the hip flexor while activating the glute. Hold for 20-30 seconds, then switch sides.

Supine Knee Rocks: Lie on your back with knees bent and feet flat. Let both knees fall to the right side while keeping your shoulders on the floor. Hold for 20-30 seconds, feeling the stretch in your left glute and lower back. Return to center and repeat on the other side.

Perform this sequence after long periods of sitting (such as after meals, long car rides, or work sessions) to prevent the accumulation of tightness. Consistency matters more than duration, three 30-second stretches spread throughout the day work better than one long session.

For a complete approach to staying active throughout the day, see our daily activities for seniors guide.

How Often Should Seniors Stretch Their Glutes

Seniors should stretch their glutes 3-5 times per week for maintenance, or daily if experiencing tightness, pain, or limited mobility. Each stretching session should include 2-3 different glute stretches, held for 20-30 seconds each, and repeated 2-3 times per side.

Frequency guidelines based on goals:

  • Maintenance (no current pain): 3 times per week, 2-3 stretches per session
  • Addressing tightness: 5-6 times per week, 3-4 stretches per session
  • Managing pain: Daily, 4-5 stretches per session, potentially twice per day

The best times to stretch are after light activity when muscles are warm, such as after a walk, after a warm shower, or following gentle exercises for seniors. Avoid aggressive stretching first thing in the morning when muscles are stiffest and cold.

Consistency produces better results than intensity. Gentle, regular stretching gradually lengthens muscle fibers and resets their resting length, while aggressive stretching can cause muscle guarding and actually increase tightness.

How Long Does It Take to Loosen Tight Glutes

Most seniors notice initial improvement in glute tightness within 2-3 weeks of consistent stretching, with significant changes occurring after 4-6 weeks of regular practice. The timeline depends on the severity of tightness, frequency of stretching, and whether you address contributing factors like prolonged sitting.

Typical progression:

  • Week 1-2: Improved awareness of tightness; stretches may feel uncomfortable but should not cause pain
  • Week 3-4: Noticeable increase in range of motion; reduced stiffness when standing from sitting
  • Week 5-8: Measurable improvement in flexibility; decreased back or hip pain; easier movement during daily activities
  • Week 9+: Maintenance phase; continued improvement if stretching continues

Factors that speed up progress include combining stretching with strengthening exercises, reducing sitting time, staying hydrated, and maintaining consistency. Factors that slow progress include inconsistent stretching, continuing to sit for long periods without breaks, and stretching too aggressively (which causes muscle guarding).

If you see no improvement after 4-6 weeks of consistent daily stretching, consult a physical therapist to assess whether other factors (such as joint problems, nerve issues, or compensation patterns) are preventing progress.

How Long Does It Take to Loosen Tight Glutes

Glute Stretches For Seniors With Arthritis

Seniors with arthritis can safely stretch their glutes by using modified positions that avoid deep hip flexion and by working within a comfortable range of motion. Arthritis in the hips, knees, or lower back requires adjustments to standard stretches, but the benefits of maintaining glute flexibility remain important for managing pain and preserving function.

Modified stretches for arthritis:

Gentle Supine Knee-to-Chest: Lie on your back and bring one knee toward your chest only as far as comfortable, using your hands to support behind the thigh (never pulling on the knee joint itself). Hold for 15-20 seconds. This stretch is gentler than the figure-4 variation and puts less stress on the hip joint.

Seated Glute Stretch with Towel: Sit in a chair and place your right foot on a low stool. Loop a towel or resistance band around your right thigh and gently pull it toward you while keeping your back straight. This provides the stretch without requiring deep hip flexion. Hold for 20-30 seconds per side.

Standing Glute Stretch at Counter: Place your right foot on a low step or stool (6-8 inches high) in front of you. Keep your knee slightly bent and lean forward from your hips just until you feel a gentle stretch. This modification reduces the hip flexion angle compared to placing the foot on a higher surface.

Guidelines for arthritis-safe stretching:

  • Warm up the area first with gentle movement or a warm compress
  • Never force a stretch into pain, work at 60-70% of maximum stretch
  • Hold stretches for shorter durations (15-20 seconds) initially
  • Avoid stretches that cause joint pain during or after the stretch
  • Focus on consistency over intensity

If a particular stretch consistently aggravates arthritis symptoms, skip it and focus on the variations that feel manageable. The goal is to maintain available range of motion, not to achieve maximum flexibility.

For additional arthritis-friendly movement options, see our guide to yoga for senior beginners.

Difference Between Static and Dynamic Glute Stretches For Seniors

Static stretches involve holding a position without movement for 20-30 seconds and work best for seniors because they safely lengthen tight muscles without requiring balance or coordination. Dynamic stretches involve controlled movement through a range of motion and are better used as warm-ups before activity rather than for releasing chronic tightness.

Static glute stretches (recommended for most seniors):

  • Figure-4 stretch (seated or supine)
  • Knee-to-chest stretch
  • Piriformis stretch
  • Held for 20-30 seconds, repeated 2-3 times per side
  • Best performed after light activity when muscles are warm
  • Ideal for addressing tightness and improving flexibility

Dynamic glute stretches (use as warm-ups):

  • Leg swings (forward and back, side to side)
  • Walking lunges with a twist
  • Hip circles
  • Performed for 8-12 repetitions per side
  • Best used before walking, exercise, or physical activity
  • Prepare muscles for movement rather than lengthening them

For seniors dealing with tightness, pain, or limited mobility, static stretches should be the primary focus. They’re safer, easier to perform correctly, and more effective for releasing chronic muscle tension. Dynamic stretches can be added once basic flexibility is restored and if you’re preparing for more vigorous activity like balance exercises or walking.

Glute Stretches Seniors Should Avoid

Seniors should avoid glute stretches that require extreme hip flexion, deep squatting, or positions that compromise balance or put excessive stress on the knees and lower back. Some traditional stretches carry unnecessary risk for older adults, especially those with joint issues, balance concerns, or limited flexibility.

Stretches to avoid or modify:

Deep Pigeon Pose: This yoga stretch requires lying face-down with one leg bent underneath the body at an extreme angle. It places significant stress on the knee and hip joint and is difficult to exit safely. Use the seated figure-4 stretch instead, which provides the same muscle release without the joint stress or floor transition.

Standing Figure-4 (unsupported): Balancing on one leg while pulling the other knee toward the chest creates a high fall risk. Always perform this stretch while holding a counter, wall, or sturdy chair for support, or use the seated version instead.

Hurdler Stretch: Sitting on the floor with one leg extended and the other bent back behind the body (like a hurdler position) puts extreme stress on the bent knee and is difficult to get into and out of safely. This stretch offers no advantages over safer alternatives.

Aggressive Bouncing Stretches: Any stretch that involves bouncing or pulsing movements can trigger the muscle’s protective reflex, causing it to tighten rather than lengthen. This approach also increases injury risk. Always stretch smoothly and hold positions steadily.

Warning signs a stretch is inappropriate:

  • Sharp pain in the joint (different from muscle stretch sensation)
  • Inability to breathe normally while holding the position
  • Tingling, numbness, or radiating pain
  • Feeling unstable or at risk of falling
  • Inability to exit the position easily

When in doubt, choose the simplest, most supported version of a stretch. Seated and supine positions are almost always safer than standing or floor-based stretches for seniors.

Glute Stretches That Don’t Require Getting on the Floor

Seniors who cannot get down on the floor or who have difficulty transitioning from floor to standing can effectively stretch their glutes using bed-based and chair-based positions. These alternatives provide equivalent muscle release without the physical challenge of floor transitions.

Bed-based stretches:

Supine Figure-4 on Bed: Lie on your back in bed with knees bent. Cross your right ankle over your left knee and thread your hands through to clasp behind your left thigh. Pull your left thigh toward your chest. This works identically to the floor version but eliminates the need to get up from the floor.

Side-lying Glute Stretch: Lie on your left side in bed with knees bent. Pull your right knee toward your chest while keeping your left leg stationary. This stretches the right glute and is particularly comfortable for those with back issues.

Chair-based stretches:

Seated Figure-4: Described earlier, this is the most versatile no-floor glute stretch. Can be performed in any sturdy chair throughout the day.

Standing Counter Stretch: Stand facing a counter and place your right foot on the counter surface (or on a chair seat if the counter is too high). Lean forward from your hips until you feel a stretch in your right glute. This stretch is accessible for those who can stand but cannot get on the floor.

Bed Edge Stretch: Sit on the edge of your bed with your right ankle crossed over your left knee. Lean forward from your hips while keeping your back straight. The softer surface of the bed makes this more comfortable than a hard chair for some people.

These modifications ensure that mobility limitations don’t prevent you from maintaining glute flexibility. Choose the positions that feel most stable and comfortable for your body.

For more ways to stay active without floor work, explore our standing exercises for seniors.

Do Seniors Need Different Stretches Than Younger People

Seniors need the same basic glute stretches as younger people but should use modified positions that accommodate reduced flexibility, balance concerns, and joint sensitivity. The muscle anatomy and stretching principles remain the same across age groups, but the execution and precautions differ.

Key differences for seniors:

  • Position modifications: Prefer seated and supine positions over standing or deep floor positions
  • Reduced intensity: Work at 60-80% of maximum stretch rather than pushing to the limit
  • Longer warm-up: Spend more time warming muscles before stretching (light movement or warmth)
  • More support: Use chairs, walls, counters, or props for stability during stretches
  • Shorter hold times initially: Start with 15-20 seconds if new to stretching, gradually working up to 30 seconds
  • Greater focus on consistency: Regular, gentle stretching produces better results than occasional aggressive stretching

The stretches themselves, figure-4, knee-to-chest, piriformis stretch, work for all ages. What changes is how you perform them. A 30-year-old might do a figure-4 stretch on the floor without support, while a 70-year-old does the same stretch seated in a chair. Both achieve the same muscle release; the older version simply includes more practical support and safety measures.

Seniors should also pay more attention to how stretches feel during and after. Joint pain (as opposed to muscle stretch sensation) is a signal to modify the position, not push through it. This awareness becomes more important with age as joint changes become more common.

Conclusion

Glute stretches for seniors address a common source of discomfort and limited mobility that develops from prolonged sitting and reduced activity. Tight gluteal muscles contribute to lower back pain, hip stiffness, and difficulty with everyday movements like standing from chairs and walking. Regular stretching, performed 3-5 times per week using seated, standing, or bed-based positions, can produce noticeable improvement within 2-4 weeks.

The most effective approach combines several stretches (figure-4, knee-to-chest, and seated variations) held for 20-30 seconds each, performed when muscles are warm. Seniors with arthritis, balance concerns, or limited mobility should focus on modified positions that provide support and avoid deep joint flexion. Static stretches work better than dynamic movements for releasing chronic tightness.

Next steps:

  1. Choose 2-3 glute stretches from this guide that match your current mobility level
  2. Perform them 3 times this week after light activity or a warm shower
  3. Hold each stretch for 20-30 seconds without forcing or bouncing
  4. Notice how your back, hips, and movement feel after two weeks of consistent practice
  5. Add more stretches or increase frequency if you want faster progress

Consistency matters more than intensity. Even five minutes of gentle stretching several times per week can restore comfort and function to tight glutes, making daily activities easier and more comfortable. For a complete approach to staying mobile and active, combine glute stretching with the simple mobility exercises and healthy habits that support long-term function.


References

[2] Glute Exercises For Seniors The Best Moves To Try And Why Theyre So Good For You – https://www.agebold.com/resources/glute-exercises-for-seniors-the-best-moves-to-try-and-why-theyre-so-good-for-you

[5] At Home Exercises Stretches For Your Glutes – https://shelteringarmsinstitute.com/rehablogs/at-home-exercises-stretches-for-your-glutes/

[7] Stretches For Tight Glutes – https://www.goodrx.com/well-being/movement-exercise/stretches-for-tight-glutes


This article is part of our Stretching & Flexibility Exercises for Seniors series.

Share This Page

Chair Stretching Exercises For Seniors: A Complete Seated Stretching Routine

Professional () hero image with (โ‰ค42 chars): 'Chair Stretching Exercises For Seniors' in crisp white on a semi-transparent

Last updated: July 15, 2026

Quick Answer

Chair stretching exercises for seniors are gentle movements performed while seated that improve flexibility, reduce stiffness, and maintain range of motion without requiring balance or floor work. A complete routine takes 10-15 minutes and targets the neck, shoulders, back, hips, and legs. Most stretches are held for 15-30 seconds and repeated 2-3 times per side.

Key Takeaways

  • Chair stretches allow seniors to improve flexibility safely while seated, eliminating fall risk and balance concerns
  • A complete seated stretching routine covers six body areas: neck, shoulders, arms, back, hips, and legs
  • Hold each stretch for 15-30 seconds and repeat 2-3 times per side for best results
  • Stretching 3-5 times per week helps maintain joint mobility and reduces everyday stiffness
  • Chair stretching differs from chair yoga, stretching focuses on lengthening muscles, while yoga combines poses, breathing, and balance
  • Seniors with arthritis, limited mobility, or joint replacements can safely perform modified chair stretches
  • Physical therapists commonly recommend chair stretching as part of home exercise programs for older adults
  • Morning stretching helps reduce stiffness; evening stretching can improve sleep quality

What Are the Best Chair Stretching Exercises For Seniors

The most effective chair stretches for seniors target areas that commonly lose flexibility with age: the neck, shoulders, upper back, lower back, hips, hamstrings, and ankles. A well-rounded routine includes 8-12 stretches that address each major muscle group while remaining fully seated.

Upper Body Stretches:

  • Neck tilts and turns: Gently tilt head toward each shoulder, then turn to look over each shoulder, holding 15-20 seconds per side
  • Shoulder rolls: Roll shoulders backward in large circles 5-10 times to release upper back tension
  • Overhead reach: Interlace fingers and press palms toward ceiling, straightening arms and feeling the stretch through sides and shoulders
  • Seated side bend: Raise one arm overhead and lean gently to the opposite side, stretching the torso

Lower Body Stretches:

  • Seated hamstring stretch: Extend one leg straight with heel on floor, flex foot, and lean forward from hips
  • Ankle circles: Lift one foot slightly and rotate ankle slowly in both directions, 10 circles each way
  • Hip flexor stretch: Sit near chair edge, extend one leg back with toe on floor, and press hips forward gently
  • Seated spinal twist: Place one hand on opposite knee, twist torso toward that side, and look over shoulder

Harvard Health recommends accumulating about 60 seconds total per stretch by holding each position and repeating on both sides.[1] For a structured approach, consider following a senior chair exercise routine that combines stretching with strength work.

How Long Should Seniors Hold Stretches While Sitting

How Long Should Seniors Hold Stretches While Sitting

Seniors should hold each seated stretch for 15-30 seconds and repeat 2-3 times per side to achieve the recommended 60 seconds of total stretch time per muscle group. This approach is gentler than holding a single long stretch and allows the muscle to gradually relax.

The standard protocol:

  • First hold: 15-20 seconds (initial lengthening)
  • Brief rest: 5-10 seconds (release and reset)
  • Second hold: 20-30 seconds (deeper stretch as muscle relaxes)
  • Optional third hold: 20-30 seconds (maximum safe range)

Avoid bouncing or forcing any stretch. The sensation should be a gentle pull, never pain. If a stretch feels uncomfortable, reduce the range of motion or hold time. Breathing steadily throughout each stretch helps muscles relax and improves the effectiveness of the movement.

For seniors new to stretching, starting with 10-15 second holds and gradually increasing duration over several weeks prevents soreness. More guidance on safe stretching practices can be found in our stretching for seniors guide.

Can Chair Stretches Help With Arthritis and Joint Pain

Chair stretches can reduce arthritis-related stiffness and improve joint mobility when performed gently and consistently. Regular stretching maintains the range of motion in arthritic joints, reduces morning stiffness, and can decrease pain levels over time.

How stretching helps arthritis:

  • Keeps synovial fluid circulating in joints, which lubricates cartilage
  • Prevents muscles around joints from tightening and adding extra stress
  • Maintains functional range of motion for daily activities
  • Reduces the “gelling” effect that causes stiffness after sitting

Modifications for arthritic joints:

  • Stretch during times of day when joints feel best (often mid-morning after warming up)
  • Use smaller ranges of motion and avoid pushing into painful areas
  • Hold stretches for shorter periods (10-15 seconds) if longer holds increase discomfort
  • Apply heat before stretching if morning stiffness is severe
  • Focus on gentle, sustained stretches rather than aggressive lengthening

Seniors with knee arthritis should skip or modify stretches that require deep knee bending. Those with hip replacements should avoid crossing legs or rotating hips beyond the range approved by their surgeon. Always check with a doctor or physical therapist before starting a new stretching routine if you have arthritis or other joint conditions.

Can Chair Stretches Help With Arthritis and Joint Pain

Chair Stretching vs Standing Stretches For Older Adults

Chair stretching eliminates balance demands and fall risk, making it safer for seniors with stability concerns, while standing stretches engage more stabilizing muscles and can improve balance when performed carefully. The choice depends on individual mobility, balance confidence, and specific goals.

Chair stretching advantages:

  • No fall risk, suitable for seniors with balance issues, vertigo, or fear of falling
  • Easier to maintain proper form without worrying about stability
  • Accessible for those with limited standing tolerance or leg weakness
  • Can be done anywhere a chair is available
  • Allows focus on the stretch itself rather than staying upright

Standing stretches advantages:

  • Engage core and leg stabilizers, providing balance training alongside flexibility work
  • Allow greater range of motion in hip flexors and calves
  • More functional for activities that require standing flexibility
  • Can be combined with balance exercises for seniors

Many seniors benefit from a mixed approach: chair stretches on days when energy or balance is lower, and standing stretches when feeling stronger. A seated workout routine can incorporate both stretching and strengthening movements.

What’s the Difference Between Chair Yoga and Chair Stretching

Chair stretching focuses specifically on lengthening muscles and improving flexibility through sustained holds, while chair yoga combines physical poses with breathing exercises, meditation, and balance elements drawn from traditional yoga practice. Both are performed seated, but the approach and goals differ.

Chair stretching characteristics:

  • Primary goal: increase flexibility and reduce muscle tightness
  • Movements: sustained static stretches held 15-30 seconds
  • Focus: specific muscle groups and joints
  • Breathing: natural, steady breathing to support relaxation
  • Duration: typically 10-15 minutes for a complete routine

Chair yoga characteristics:

  • Primary goal: integrate mind-body connection, flexibility, strength, and calm
  • Movements: modified yoga poses (asanas) adapted for seated practice
  • Focus: whole-body integration, breath awareness, mindful movement
  • Breathing: specific pranayama (breathing) techniques taught as part of practice
  • Duration: typically 20-45 minutes including meditation or relaxation

Chair stretching is more straightforward and requires no knowledge of yoga philosophy or breathing techniques. Chair yoga offers additional mental and spiritual benefits but requires more instruction to learn properly. For seniors interested in yoga-specific movements, our yoga poses for senior beginners guide provides clear starting points.

Are Chair Stretches Safe For Seniors With Limited Mobility

Chair stretches are among the safest flexibility exercises for seniors with limited mobility because they require minimal movement, provide constant support, and can be modified to accommodate almost any physical limitation. Even seniors with significant mobility restrictions can perform modified versions of most stretches.

Safety features for limited mobility:

  • Constant seated support reduces fall risk to nearly zero
  • Small range-of-motion adjustments make stretches accessible
  • No need to get up and down from the floor
  • Can be performed with assistive devices nearby (walker, cane)
  • Easy to stop immediately if discomfort occurs

Modifications for specific limitations:

  • Shoulder problems: Keep arm stretches below shoulder height; skip overhead reaches
  • Hip restrictions: Avoid crossing legs; use smaller rotation ranges in twists
  • Knee issues: Skip or minimize knee extension stretches; keep bent knee comfortable
  • Neck problems: Use very gentle ranges; skip deep neck rotations
  • Recent surgery: Follow surgeon’s specific restrictions; wait for clearance before resuming

Seniors with severe mobility limitations should start with just 3-5 stretches targeting the areas that feel stiffest, gradually adding more movements as comfort improves. Working with a physical therapist for the first few sessions ensures proper form and appropriate modifications.

How Often Should Seniors Do Chair Stretching Exercises

Seniors should perform chair stretching exercises 3-5 times per week for maintenance of flexibility, or daily if addressing specific stiffness or mobility limitations. Each session should last 10-15 minutes and cover all major muscle groups.

Frequency guidelines:

  • Maintenance (general flexibility): 3-4 times per week
  • Active improvement (increasing range): 5-7 times per week
  • Arthritis management: Daily, during times when joints feel best
  • Post-surgery recovery: As prescribed by physical therapist (often daily)
  • General wellness: 3 times per week minimum

Weekly schedule example:

  • Monday: Full-body chair stretching routine (15 minutes)
  • Wednesday: Upper body focus (10 minutes)
  • Friday: Lower body and back focus (10 minutes)
  • Sunday: Gentle full-body routine (12 minutes)

Consistency matters more than duration. A daily 5-minute routine targeting problem areas (stiff neck, tight shoulders, lower back) often produces better results than an occasional 30-minute session. Many seniors find that pairing stretching with another daily habit, morning coffee, after lunch, before evening news, helps maintain consistency.

Stretching can be combined with other seated exercises for seniors to create a more complete fitness routine.

Chair Stretches For Lower Back Pain in Seniors

Seated stretches for lower back pain focus on gentle spinal flexion, rotation, and hip flexibility to reduce tension in muscles that contribute to back discomfort. Three to five targeted stretches performed daily can significantly reduce chronic lower back stiffness.

Most effective seated stretches for lower back:

1. Seated cat-cow stretch

  • Sit upright with hands on knees
  • Arch back gently, lifting chest (cow position)
  • Round spine, tucking chin to chest (cat position)
  • Alternate slowly 8-10 times

2. Seated forward fold

  • Sit near chair edge with feet flat
  • Hinge forward from hips, letting arms hang toward floor
  • Keep back relaxed, not forcing the stretch
  • Hold 20-30 seconds

3. Seated spinal twist

  • Sit sideways in chair with both feet flat
  • Hold chair back with both hands
  • Gently rotate torso toward chair back
  • Hold 20 seconds, repeat other side

4. Knee-to-chest stretch

  • Sit upright, lift one knee toward chest
  • Clasp hands behind thigh (not on kneecap)
  • Gently pull knee closer, feeling lower back lengthen
  • Hold 20 seconds per leg

5. Seated hip flexor release

  • Sit near front edge of chair
  • Extend one leg back, toe on floor
  • Keep torso upright and gently press hips forward
  • Hold 20 seconds per side

These stretches work best when performed twice daily, once in the morning to reduce overnight stiffness and once in the evening to release accumulated tension. For additional relief strategies, see our guide to back stretching exercises for seniors.

Can You Lose Weight or Improve Flexibility With Chair Stretching Alone

Chair stretching alone will improve flexibility and reduce stiffness but will not produce significant weight loss because it burns minimal calories, typically 50-80 calories per 15-minute session. For weight management, stretching should be combined with other forms of exercise and dietary changes.

What chair stretching does provide:

  • Measurable flexibility improvements within 2-4 weeks
  • Reduced muscle tightness and joint stiffness
  • Better range of motion for daily activities
  • Improved posture and body awareness
  • Reduced pain from tight muscles
  • Foundation for adding other exercises

What chair stretching does not provide:

  • Significant calorie burn for weight loss
  • Cardiovascular conditioning
  • Muscle strength gains
  • Bone density improvement

For weight management, chair stretching works best as one component of a broader program that includes easy chair exercises for seniors with strength and cardio elements. A complete approach might include:

  • Chair stretching (3-5 days/week, 10-15 minutes)
  • Seated strength exercises with light weights (2-3 days/week)
  • Chair-based cardio movements or walking (most days, 20-30 minutes)
  • Dietary adjustments for calorie management

Flexibility improvements from consistent stretching typically appear within 3-4 weeks, with noticeable gains in how far you can reach, bend, or rotate.

Can You Lose Weight or Improve Flexibility With Chair Stretching Alone

What Mistakes Do Seniors Make When Stretching in a Chair

The most common mistakes seniors make during chair stretching include bouncing or forcing stretches, holding their breath, using an unstable chair, and rushing through movements without proper warm-up. These errors reduce effectiveness and increase injury risk.

Top mistakes and corrections:

1. Bouncing during stretches

  • Problem: Creates micro-tears in muscle fibers and triggers protective tightening
  • Fix: Hold stretches steady without any bouncing or pulsing motion

2. Holding breath during stretches

  • Problem: Increases muscle tension and blood pressure
  • Fix: Breathe steadily throughout each stretch; exhale as you deepen the stretch

3. Using an unstable chair

  • Problem: Rolling, sliding, or tippy chairs create fall risk
  • Fix: Use a sturdy chair without wheels, with all four legs firmly on floor

4. Stretching cold muscles

  • Problem: Tight muscles are more prone to strain
  • Fix: Do 2-3 minutes of gentle movement (arm circles, marching in place) before stretching

5. Pushing into pain

  • Problem: Pain signals potential injury, not effective stretching
  • Fix: Stretch to gentle tension only; if it hurts, reduce the range

6. Rushing through the routine

  • Problem: Muscles need time to lengthen; quick stretches have minimal effect
  • Fix: Hold each stretch for the full 15-30 seconds

7. Inconsistent practice

  • Problem: Flexibility gains disappear quickly without regular practice
  • Fix: Schedule stretching at the same time each day to build a habit

8. Wearing restrictive clothing

  • Problem: Tight pants or belts limit movement and comfort
  • Fix: Wear loose, comfortable clothing that allows full range of motion

Chair Stretching Exercises For Seniors With Bad Knees

Seniors with knee problems can safely perform chair stretches by avoiding deep knee bending, maintaining comfortable knee angles, and focusing on hip, ankle, and upper body flexibility. Most seated stretches place minimal stress on knee joints.

Safe stretches for bad knees:

  • Ankle circles and flexes: Improve lower leg flexibility without knee movement
  • Seated hamstring stretch: Keep knee slightly bent rather than fully straight
  • Hip rotations: Sit and gently rotate one bent leg in and out from hip
  • Quadriceps stretch: If standing is possible, hold chair for balance and bend knee gently
  • Calf stretch: Extend leg with heel on floor, flex foot to feel calf stretch
  • All upper body stretches: Neck, shoulders, arms, and back stretches place no stress on knees

Stretches to avoid or modify:

  • Deep knee bends or squats (skip these entirely)
  • Full knee extension if it causes pain (keep slight bend)
  • Crossing legs if knee arthritis is severe
  • Any position that requires kneeling

For seniors with knee replacements, follow the specific range-of-motion guidelines provided by the surgeon and physical therapist. Most can perform standard seated stretches after the initial recovery period, but some rotational movements may remain restricted.

Combining gentle stretching with leg strengthening exercises for seniors helps support knee joints and reduce pain over time.

Do Physical Therapists Recommend Chair Stretching For Elderly

Physical therapists commonly recommend chair stretching for elderly patients as part of home exercise programs because it is safe, accessible, and effective for maintaining functional mobility. Chair-based routines are standard prescriptions for seniors recovering from surgery, managing chronic conditions, or working to prevent falls.

Why physical therapists prescribe chair stretching:

  • Eliminates fall risk during flexibility work
  • Easy to perform independently at home without supervision
  • Requires no special equipment beyond a sturdy chair
  • Addresses common problem areas (tight hips, stiff shoulders, limited spinal rotation)
  • Can be progressed or modified based on individual needs
  • Builds foundation for more advanced exercises

Typical PT recommendations:

  • Start with 5-6 basic stretches covering major muscle groups
  • Perform daily or at least 5 times per week
  • Hold stretches 20-30 seconds, repeat 2-3 times
  • Combine with simple strength exercises for balanced programming
  • Progress to standing stretches when balance improves

Physical therapists often provide printed handouts or videos demonstrating proper form for each stretch. A DailyCaring article outlines a widely used 12-stretch routine that many therapists recommend, emphasizing strict posture (upright torso, feet flat, hips aligned) throughout the session.[6]

For seniors working with a physical therapist, chair stretching typically serves as homework between sessions, complementing the more intensive work done during appointments.

How to Modify Chair Stretches If You Have Shoulder Problems

Seniors with shoulder problems should modify chair stretches by keeping arms below shoulder height, avoiding overhead reaches, and using smaller ranges of motion during rotational movements. Most upper body stretches can be adapted to remain effective while protecting injured or painful shoulders.

Safe shoulder stretch modifications:

1. Overhead reach โ†’ Chest expansion

  • Instead of reaching arms overhead, clasp hands behind back
  • Gently squeeze shoulder blades together
  • Lift hands slightly away from body
  • No shoulder elevation required

2. Shoulder rolls โ†’ Gentle shoulder shrugs

  • Lift shoulders toward ears (small range)
  • Lower slowly with control
  • Skip the rolling motion if it causes clicking or pain

3. Cross-body shoulder stretch โ†’ Modified version

  • Bring arm across chest only to comfortable range
  • Use opposite hand on elbow (not pulling)
  • Hold gentle position without forcing

4. Side bend with arm raised โ†’ Side bend with arm down

  • Keep arm at side or hand on hip
  • Bend torso gently to side
  • Feel stretch along side body without shoulder involvement

Conditions requiring extra caution:

  • Rotator cuff tears: Avoid all overhead movements and external rotation
  • Frozen shoulder: Use very small ranges; focus on gentle pendulum movements
  • Shoulder replacement: Follow surgeon’s specific restrictions (usually no reaching behind back for 12 weeks)
  • Arthritis: Warm shoulder with heat pack before stretching; use smaller ranges

For shoulder-specific flexibility work, consult a physical therapist who can demonstrate safe stretches tailored to your particular shoulder condition.

Best Time of Day For Seniors to Do Chair Stretching Routine

Morning is the most beneficial time for seniors to perform chair stretching because it reduces overnight stiffness, improves circulation after hours of inactivity, and sets a positive tone for the day’s activities. However, consistency at any time of day produces better results than inconsistent morning practice.

Morning stretching benefits:

  • Reduces the “gelling” effect from overnight immobility
  • Loosens joints before daily activities begin
  • Improves circulation and alertness
  • Establishes a consistent daily routine
  • Prepares body for movement throughout the day

Evening stretching benefits:

  • Releases accumulated tension from daily activities
  • Can improve sleep quality by relaxing muscles
  • May reduce nighttime cramping
  • Provides a calming wind-down routine

Timing considerations:

  • Arthritis: Mid-morning (after joints have warmed up naturally) often feels best
  • Stiffness: Morning stretching provides maximum relief
  • Energy levels: Choose times when energy is highest for best consistency
  • Medication schedule: Some seniors find stretching easier after pain medication takes effect

The most important factor is consistency. A stretching routine performed at the same time each day becomes a habit that requires less willpower to maintain. Many seniors find success by pairing stretching with an existing daily activity:

  • After morning coffee
  • Before or after breakfast
  • During a favorite TV show
  • After lunch
  • Before evening news

For seniors managing multiple health conditions, a brief 5-minute workout for seniors that includes stretching can fit into any schedule.

Complete 12-Stretch Chair Routine For Seniors

This complete seated stretching routine covers all major muscle groups and takes approximately 12-15 minutes. Perform each stretch slowly, hold for 20-30 seconds, and repeat 2-3 times per side where applicable.

Setup:

  • Use a sturdy chair without wheels
  • Sit upright with feet flat on floor, hip-width apart
  • Keep hips aligned and core gently engaged
  • Breathe steadily throughout

The Routine:

1. Neck Side Tilt

  • Gently tilt right ear toward right shoulder
  • Hold 20 seconds, return to center
  • Repeat on left side

2. Neck Rotation

  • Turn head to look over right shoulder
  • Hold 20 seconds, return to center
  • Repeat on left side

3. Shoulder Rolls

  • Roll both shoulders backward in large circles
  • Perform 8-10 slow, controlled circles

4. Overhead Reach

  • Interlace fingers, press palms toward ceiling
  • Straighten arms, feel stretch through sides
  • Hold 20-30 seconds

5. Seated Side Bend

  • Raise right arm overhead, lean left
  • Keep hips on chair, feel stretch along right side
  • Hold 20 seconds, repeat other side

6. Seated Spinal Twist

  • Place right hand on left knee
  • Twist torso left, look over left shoulder
  • Hold 20 seconds, repeat other side

7. Seated Forward Fold

  • Hinge forward from hips, let arms hang
  • Relax back and neck
  • Hold 20-30 seconds

8. Seated Hamstring Stretch

  • Extend right leg straight, heel on floor
  • Flex foot, lean forward from hips
  • Hold 20 seconds, repeat left leg

9. Hip Flexor Stretch

  • Sit near chair edge
  • Extend right leg back, toe on floor
  • Press hips gently forward
  • Hold 20 seconds, repeat left side

10. Ankle Circles

  • Lift right foot slightly off floor
  • Rotate ankle slowly: 10 circles clockwise, 10 counterclockwise
  • Repeat with left foot

11. Ankle Flexes

  • Extend right leg, alternate pointing toes and flexing foot
  • Perform 10-12 slow flexes
  • Repeat with left foot

12. Chest Expansion

  • Clasp hands behind back
  • Squeeze shoulder blades together
  • Lift hands slightly away from body
  • Hold 20-30 seconds

This routine can be shortened by selecting 5-6 stretches that target your stiffest areas, or extended by adding more repetitions of each movement.

Conclusion

Chair stretching exercises for seniors provide a safe, accessible way to maintain flexibility, reduce stiffness, and improve range of motion without requiring balance or floor work. A complete seated routine takes just 10-15 minutes and can be performed 3-5 times per week to maintain joint mobility and muscle length.

The most effective approach includes stretches for all major muscle groups, neck, shoulders, back, hips, and legs, with each stretch held for 15-30 seconds and repeated 2-3 times per side. Seniors with arthritis, limited mobility, shoulder problems, or bad knees can safely perform modified versions of most stretches by adjusting range of motion and avoiding positions that cause discomfort.

Physical therapists commonly recommend chair stretching as part of home exercise programs because it eliminates fall risk while addressing the flexibility limitations that affect everyday function. Morning stretching reduces overnight stiffness most effectively, but consistency at any time of day produces better results than sporadic practice.

Next steps:

  1. Choose 5-6 stretches from the complete routine that target your stiffest areas
  2. Set a specific time each day for your stretching practice
  3. Start with 10-15 second holds and gradually increase to 20-30 seconds over 2-3 weeks
  4. Add 1-2 new stretches each week until you’re performing the full routine
  5. Consider combining stretching with simple chair exercises for seniors for a more complete fitness program
  6. Track your progress by noting which movements feel easier after 3-4 weeks of consistent practice

For seniors new to exercise or managing multiple health conditions, consulting with a physical therapist for the first few sessions ensures proper form and appropriate modifications for individual needs.

References

[1] Chair Exercises For Seniors Boosting Strength Flexibility And Stamina – https://www.health.harvard.edu/exercise-and-fitness/chair-exercises-for-seniors-boosting-strength-flexibility-and-stamina

[6] 12 Easy And Gentle Seated Stretching Exercises For Seniors In 4 Minutes Video – https://dailycaring.com/12-easy-and-gentle-seated-stretching-exercises-for-seniors-in-4-minutes-video/


This article is part of our chair-based exercises for seniors series.

Share This Page

Stretch Band Exercises For Seniors: Using Bands to Improve Flexibility and Range of Motion

Professional () hero image featuring 'Stretch Band Exercises For Seniors: Using Bands to Improve Flexibility and Range of

Last updated: June 26, 2026

Quick Answer

Stretch band exercises for seniors use elastic resistance bands to gently assist or deepen stretches, helping improve flexibility, joint range of motion, and muscle length without high impact. These bands provide controlled tension that makes stretching more effective than static stretching alone, and most exercises can be done seated or standing. Regular practiceโ€”three to four times per weekโ€”typically shows noticeable improvements in mobility within four to six weeks.

Key Takeaways

  • Stretch bands provide controlled resistance that helps deepen stretches safely and improve joint range of motion more effectively than static stretching alone
  • Most stretch band exercises can be performed seated or standing, making them accessible for people with mobility limitations or balance concerns
  • Light resistance bands (typically color-coded yellow or red) work best for flexibility training, while heavier bands are better suited for strength work
  • Three to four sessions per week, holding each stretch for 15-30 seconds, produces measurable flexibility improvements within four to six weeks
  • Stretch bands cost $10-25 for a basic set and require minimal space, making them practical for home use
  • People with arthritis, joint replacements, or recent injuries can use stretch bands safely with proper resistance selection and medical clearance
  • Common mistakes include using too much resistance, bouncing during stretches, and holding breath instead of breathing steadily

What Are Stretch Bands and How Do They Work for Seniors

Stretch bands are elastic resistance bands made from rubber or latex that provide gentle, adjustable tension during stretching movements. Unlike strength-training resistance bands that focus on building muscle, stretch bands for flexibility work help lengthen muscles, increase joint mobility, and improve overall range of motion through assisted or resisted stretching.

What Are Stretch Bands and How Do They Work for Seniors

The bands work by creating external resistance or assistance that allows you to stretch deeper than you could with body weight alone. When you pull against a band during a stretch, the elastic tension helps guide your movement through a fuller range of motion while keeping the stretch controlled and safe [4].

For seniors, this controlled resistance offers several advantages:

  • Adjustable intensity: You control how much tension by adjusting your grip or choosing different resistance levels
  • Visual feedback: The band’s tension shows you’re working, unlike static stretches where progress is harder to gauge
  • Support for limited mobility: Bands can help pull limbs into stretches that might otherwise be difficult to reach
  • Low impact: No jumping, pounding, or joint stress involved

Stretch bands differ from therapy bands (very light resistance used in physical therapy) and heavy-duty strength bands. For flexibility work, you want bands that provide enough resistance to assist movement but not so much that they fatigue muscles quickly.

Best Stretch Band Exercises for Seniors With Arthritis

Seniors with arthritis can safely use stretch bands to maintain joint mobility and reduce stiffness, but exercise selection and resistance level matter significantly. Light resistance bands work best because they provide gentle assistance without stressing inflamed joints [4].

Recommended exercises for arthritic joints:

Seated Hamstring Stretch
Loop the band around the bottom of one foot while seated. Hold both ends and gently pull the band toward you, keeping the leg extended. This stretches the back of the thigh without bending forward, which can stress arthritic hips [1].

Doorway Chest Stretch
Anchor the band at shoulder height in a doorway. Hold one end and step forward until you feel a gentle stretch across the chest and front of the shoulder. This helps counter rounded posture common with shoulder arthritis [1].

Ankle Circles With Band
Loop the band around your foot while seated. Use the band to guide your ankle through circular motions in both directions. This maintains ankle mobility without bearing weight on arthritic joints [4].

Gentle Shoulder Rolls
Hold the band with both hands at shoulder width. Raise arms overhead slowly, letting the band guide the movement. This maintains shoulder range of motion without forcing joints [2].

Important modifications for arthritis:

  • Work within pain-free range onlyโ€”stretch should feel like gentle tension, not sharp pain
  • Warm up joints with 5-10 minutes of gentle movement before stretching
  • Avoid stretching during active flare-ups when joints are hot or swollen
  • Choose bands with handles if grip strength is limited

The Cleveland Clinic notes that seated exercises are particularly helpful for seniors managing arthritis because they reduce stress on weight-bearing joints while maintaining flexibility [3].

How Often Should Seniors Do Stretch Band Exercises

Seniors should perform stretch band exercises three to four times per week for best results in improving flexibility and range of motion. This frequency allows adequate recovery time between sessions while providing enough consistent practice to create measurable changes in muscle length and joint mobility.

Recommended session structure:

  • Duration: 15-20 minutes per session
  • Repetitions: Hold each stretch for 15-30 seconds
  • Sets: Repeat each stretch 2-3 times
  • Rest: Take 10-15 seconds between repetitions

More frequent stretching (daily) is safe but not necessary for most people. Three to four weekly sessions produce similar flexibility gains to daily practice while being easier to maintain long-term [6].

Weekly schedule example:

  • Monday: Upper body stretches (shoulders, chest, arms)
  • Wednesday: Lower body stretches (hips, hamstrings, calves)
  • Friday: Full body routine
  • Sunday: Gentle mobility work (optional)

Consistency matters more than intensity. Regular moderate stretching produces better results than occasional aggressive stretching, which can cause muscle soreness and reduce motivation to continue.

If you’re combining stretch band work with other exercise, sequence matters. Stretching works best after muscles are warm, so place it after walking or light strength work, or do a brief 5-minute warm-up first.

Stretch Band Exercises vs Yoga for Seniors Flexibility

Stretch band exercises and yoga both improve flexibility, but they differ in approach, skill requirements, and accessibility. Stretch bands focus specifically on isolated joint mobility and muscle lengthening, while yoga combines stretching with balance, breathing, and body awareness in flowing sequences.

Stretch band advantages:

  • Easier to learnโ€”fewer complex positions to remember
  • More adaptable for limited mobilityโ€”most exercises work seated
  • Adjustable resistance lets you control intensity precisely
  • Requires less floor work, which helps people who struggle getting up and down
  • Shorter time commitmentโ€”effective in 15-20 minutes

Yoga advantages:

  • Addresses multiple fitness components simultaneously (flexibility, balance, strength, breathing)
  • Provides mental relaxation and stress reduction through mindfulness
  • Offers structured progressions and established class formats
  • No equipment needed beyond a mat
  • Social component if attending group classes

Who benefits most from each:

Choose stretch bands if you have significant mobility limitations, prefer seated exercise, want targeted work on specific tight areas, or need something simple to do at home without instruction.

Choose beginner yoga if you can safely get down to and up from the floor, want a more comprehensive practice, enjoy group settings, or are interested in the mental benefits alongside physical ones.

Many seniors benefit from combining both approachesโ€”using stretch bands for targeted flexibility work on tight areas and yoga for overall body awareness and balance. Neither is inherently better; the best choice depends on your current abilities, preferences, and specific goals.

Can Seniors With Bad Knees Use Stretch Bands Safely

Seniors with knee problems can safely use stretch bands for flexibility work because most stretching exercises don’t require bearing weight on the knees or moving through painful ranges of motion. Seated and lying positions allow you to stretch leg muscles without stressing knee joints.

Safe stretch band exercises for problem knees:

Seated Hamstring Stretch
Sit in a sturdy chair with one leg extended. Loop the band around your foot and gently pull to stretch the back of the thigh. The knee stays in a comfortable, slightly bent position throughout [1].

Lying Hip Flexor Stretch
Lie on your back and loop the band around one foot. Gently pull the knee toward your chest, keeping the other leg flat. This stretches the hip without knee stress.

Calf Stretch
Sit with legs extended and loop the band around the ball of one foot. Pull the band to bring toes toward you, stretching the calf. The knee can stay slightly bent if needed.

IT Band Stretch
Lie on your back with the band around one foot. Gently pull the leg across your body, keeping the knee slightly bent. This addresses lateral hip and thigh tightness that can affect knee alignment.

What to avoid with knee problems:

  • Deep squatting positions that compress the knee joint
  • Kneeling exercises that put direct pressure on the kneecap
  • Aggressive stretches that pull the knee past its comfortable range
  • Standing stretches if balance is compromised

If you’ve had knee replacement surgery, get clearance from your surgeon before starting any new exercise program. Most people can begin gentle stretching 6-8 weeks post-surgery, but individual timelines vary [4].

Stretch bands actually help people with knee problems maintain leg flexibility without aggravating the joint, which is important because tight hip and thigh muscles can worsen knee pain. For additional knee-friendly exercises, see our guide to seated chair exercises.

What Resistance Level Stretch Band Should I Start With as a Senior

Seniors new to stretch band exercises should start with light resistance bands, typically color-coded yellow, red, or light green depending on the manufacturer. These provide enough tension to assist stretching without fatiguing muscles or straining joints, which is the goal for flexibility work rather than strength training.

Resistance band color system (common but not universal):

  • Yellow/Tan: Extra light (2-4 lbs equivalent tension)
  • Red/Pink: Light (3-5 lbs)
  • Green: Medium-light (4-6 lbs)
  • Blue: Medium (6-8 lbs)
  • Black: Heavy (8-10 lbs)
  • Silver/Gold: Extra heavy (10+ lbs)

For flexibility and stretching purposes, stick with the first three levels. Heavier bands are designed for strength training and will make stretching exercises unnecessarily difficult.

How to test if resistance is appropriate:

  • You can hold a stretch position for 15-30 seconds without muscle fatigue
  • The band provides gentle assistance or resistance but doesn’t pull your limbs into uncomfortable positions
  • You can complete 2-3 repetitions of each stretch without needing to rest
  • Your breathing remains steady and controlled throughout

Band types for stretching:

  • Flat therapy bands: Best for flexibility work, no handles, easy to adjust length
  • Loop bands: Convenient for leg stretches, stays in place around feet
  • Tube bands with handles: Better for strength work than stretching

Most seniors benefit from purchasing a set with three resistance levels (light, medium-light, medium) so you can use lighter bands for shoulder and neck stretches and slightly more resistance for larger leg muscles. Basic sets cost $10-25 and include multiple resistance options [7].

If you have arthritis or joint problems, start with the lightest band available and progress only if stretches feel too easy. The band should assist your stretch, not create a workout.

Stretch Band Exercises for Seniors Neck and Shoulder Pain

Stretch band exercises can help relieve neck and shoulder tension by addressing tight muscles that contribute to pain and restricted movement. These areas commonly tighten from poor posture, computer use, and age-related changes in spinal alignment.

Stretch Band Exercises for Seniors Neck and Shoulder Pain

Effective stretch band exercises for neck and shoulder relief:

Doorway Chest Stretch
Anchor the band at shoulder height in a doorway or around a sturdy post. Hold one end and step forward until you feel a stretch across your chest and front of the shoulder. This counters forward-rounded shoulders that strain the neck [1].

Hold for 20-30 seconds, repeat 2-3 times per side.

Seated Band Pull-Apart
Sit upright holding the band with both hands at chest height, arms extended. Slowly pull the band apart by moving your hands outward, squeezing shoulder blades together. This strengthens upper back muscles that support good posture [2].

Perform 10-12 slow repetitions.

Shoulder Dislocation Stretch
Hold the band with a wide grip (hands wider than shoulders). Slowly raise your arms overhead and continue the arc behind you as far as comfortable. This improves shoulder mobility and reduces stiffness [2].

Perform 5-8 slow repetitions.

Neck Side Stretch With Band
Loop the band around one hand and gently pull your head toward the opposite shoulder, using the band to control the stretch. This addresses tight neck muscles on the side.

Hold 15-20 seconds per side, repeat twice.

Important technique points:

  • Keep shoulders relaxed and down, away from ears
  • Move slowly and smoothlyโ€”no jerking or bouncing
  • Breathe steadily throughout each stretch
  • Stop if you feel sharp pain or numbness

These exercises work best when combined with attention to daily posture habits. If neck or shoulder pain persists beyond two weeks or includes numbness, weakness, or radiating pain down the arm, consult a healthcare provider before continuing.

For additional upper body work, see our guide to back stretching exercises.

How Long Does It Take to See Flexibility Improvements With Stretch Bands

Most seniors notice measurable improvements in flexibility and range of motion within four to six weeks of consistent stretch band practice. Initial changes often appear soonerโ€”many people report feeling less stiff and moving more easily within two to three weeksโ€”but objective increases in joint range typically take a full month or more [6].

Timeline for flexibility changes:

  • Week 1-2: Reduced muscle tension, easier movement during daily activities
  • Week 3-4: Noticeable increase in stretch depth, less stiffness after sitting
  • Week 5-8: Measurable range of motion improvements, easier to reach and bend
  • Week 9-12: Continued gains, new baseline flexibility established

Progress depends on several factors:

  • Starting flexibility: People with significant tightness often see faster initial improvements
  • Consistency: Three to four weekly sessions produce better results than sporadic practice
  • Age and activity history: Previously active individuals may regain flexibility faster
  • Specific areas targeted: Some muscle groups respond faster than others

Hamstrings and hip flexors typically show improvement within 3-4 weeks with regular stretching. Shoulder mobility may take 6-8 weeks to change noticeably because shoulder joints involve multiple muscles and connective tissues [8].

Signs you’re making progress:

  • Daily activities feel easier (putting on shoes, reaching overhead shelves)
  • You can hold stretches longer without discomfort
  • The same band position that felt intense now feels moderate
  • You need less warm-up time before stretching feels comfortable

If you see no improvement after eight weeks of consistent practice, consider whether you’re using appropriate resistance, holding stretches long enough (15-30 seconds minimum), or working through adequate range of motion. Some people benefit from working with a physical therapist to ensure proper technique.

Flexibility gains require ongoing maintenance. If you stop stretching, most improvements reverse within 2-4 weeks, though not completely back to baseline if you’ve been practicing for several months.

Are Stretch Bands Better Than Regular Stretching for Seniors

Stretch bands typically produce better flexibility results than static stretching alone because they provide external resistance that helps guide joints through fuller ranges of motion while keeping movements controlled and safe. The bands also give visual and tactile feedback that helps you maintain proper form and consistent intensity.

Advantages of stretch bands over static stretching:

  • Greater range of motion: The band assists or resists movement, allowing deeper stretches than body weight alone
  • Better control: Elastic tension prevents overstretching and helps you move smoothly
  • Measurable progression: You can track improvement by adjusting grip width or band resistance
  • Assistance for limited mobility: Bands help pull limbs into positions you might not reach independently
  • Engagement: The active component keeps attention focused on the stretch

When static stretching works better:

  • You have good baseline flexibility and don’t need assistance reaching stretch positions
  • You prefer minimal equipment
  • You’re stretching in locations where carrying bands isn’t practical
  • You want to combine stretching with relaxation or meditation

Research on stretching methods shows that both static stretching and band-assisted stretching improve flexibility, but assisted stretching (using bands, straps, or partner assistance) tends to produce slightly larger gains in range of motion, particularly for people starting with limited flexibility [8].

Practical approach:

Most seniors benefit from using both methods strategically. Use stretch bands for:

  • Tight areas that need extra help (hamstrings, hip flexors, shoulders)
  • Structured flexibility sessions at home
  • Areas where you want measurable progression

Use static stretching for:

  • Gentle daily mobility work
  • Post-walk or post-exercise cool-downs
  • Quick tension relief throughout the day

The best stretching method is the one you’ll do consistently. If bands make stretching more engaging and effective for you, they’re worth using. If you prefer the simplicity of static stretching and do it regularly, that works too. For more on general stretching approaches, see our guide to stretching for seniors.

Common Mistakes Seniors Make With Stretch Band Exercises

Several common errors reduce the effectiveness of stretch band exercises or increase injury risk. Recognizing and correcting these mistakes helps you get better results from your flexibility work.

Using too much resistance
Many people assume heavier bands produce faster results, but for flexibility work, light resistance works best. Heavy bands fatigue muscles before you achieve a good stretch and can strain joints. Start with light bands and progress only if stretches feel too easy [4].

Bouncing or jerking during stretches
Rapid, bouncing movements trigger a protective reflex that makes muscles tighten rather than lengthen. Smooth, controlled movements with steady tension produce better flexibility gains and lower injury risk [6].

Holding your breath
Breath-holding increases muscle tension and blood pressure. Breathe steadily throughout each stretchโ€”inhale during the setup, exhale as you deepen the stretch, and continue breathing normally while holding position.

Stretching cold muscles
Stretching without warming up increases injury risk and makes stretches less effective. Spend 5-10 minutes doing light movement (marching in place, arm circles, gentle walking) before stretching sessions.

Inconsistent practice
Sporadic stretching produces minimal results. Flexibility requires consistent practiceโ€”three to four sessions per week minimum. Missing weeks and then trying to catch up with aggressive stretching doesn’t work and increases soreness.

Comparing yourself to others
Flexibility varies significantly based on genetics, activity history, and age. Focus on your own progress rather than matching what others can do. Pushing too hard to match someone else’s range of motion can cause injury.

Skipping one side
Always stretch both sides equally, even if one side feels tighter. Muscle imbalances can affect posture and movement patterns.

Ignoring pain signals
Stretching should feel like gentle tension or mild discomfort, not sharp pain. If a stretch causes pain that doesn’t ease within a few seconds, back off. Persistent pain during or after stretching indicates you’re pushing too hard or need to modify the exercise.

For additional guidance on safe exercise practices, see our guide to gentle exercises for seniors.

Stretch Bands for Seniors After Surgery or Injury Recovery

Stretch bands are commonly used in rehabilitation after surgery or injury because they provide controlled, low-impact resistance that helps restore range of motion without stressing healing tissues. However, timing and exercise selection must be appropriate for your specific recovery stage.

General recovery timeline for stretch band use:

  • Weeks 1-2 post-surgery: Usually too early for stretch bands; focus on prescribed physical therapy exercises only
  • Weeks 3-6: May begin gentle band-assisted range of motion with medical clearance
  • Weeks 6-12: Progress to more active stretching and light resistance work
  • 3+ months: Resume normal flexibility training, adjusted for any permanent limitations

Common post-surgical applications:

After joint replacement (hip, knee, shoulder)
Stretch bands help regain range of motion once initial healing is complete. Physical therapists often prescribe specific band exercises to restore flexibility without forcing joints [4].

After rotator cuff repair
Gentle band-assisted shoulder stretches help prevent stiffness while protecting healing tendons. These typically begin 4-6 weeks post-surgery under professional guidance.

After spinal surgery
Light band work can help restore trunk mobility and reduce stiffness, usually starting 6-8 weeks post-operation with surgeon approval.

After fracture healing
Once bones have healed sufficiently (typically 6-12 weeks), bands help restore normal joint mobility and muscle length around the affected area.

Critical safety rules for post-injury stretching:

  • Get explicit clearance from your surgeon or physician before starting any stretch band work
  • Follow prescribed restrictions on range of motion, resistance level, and frequency
  • Work with a physical therapist initially to learn proper technique for your specific condition
  • Progress graduallyโ€”recovery timelines vary significantly between individuals
  • Report any increase in pain, swelling, or loss of function to your healthcare provider immediately

Never assume that an exercise safe for general flexibility work is appropriate during recovery. Healing tissues have specific requirements and limitations that change as recovery progresses. When in doubt, ask your healthcare provider or physical therapist before adding any new exercises.

For more on returning to exercise after setbacks, see our guide to simple mobility exercises.

Affordable Stretch Band Sets for Seniors Where to Buy

Quality stretch band sets suitable for flexibility work cost $10-25 and are widely available online and in retail stores. You don’t need expensive equipmentโ€”basic flat resistance bands or loop bands work well for most stretching exercises.

Affordable Stretch Band Sets for Seniors Where to Buy

What to look for when buying:

  • Multiple resistance levels: Sets with 3-4 different resistance bands let you match intensity to different muscle groups
  • Flat therapy bands: Better for stretching than tube bands with handles; easier to adjust length
  • Latex or latex-free options: Choose latex-free if you have latex allergies
  • Length: Bands should be 4-6 feet long for most stretching exercises
  • Durability: Look for bands without visible cracks, tears, or thin spots

Where to buy stretch bands:

Online retailers:

  • Amazon: Wide selection, customer reviews, typically $12-20 for sets
  • Walmart.com: Budget-friendly options, often under $15
  • Target.com: Quality sets in the $15-25 range
  • Sporting goods sites (Dick’s Sporting Goods, Academy Sports): Professional-grade options

Physical stores:

  • Walmart, Target, CVS, Walgreens: Usually stock basic sets in the fitness section
  • Sporting goods stores: Larger selection but sometimes higher prices
  • Physical therapy supply stores: Professional quality but may cost more

Budget option:
Basic flat resistance band sets start around $10 and work perfectly well for flexibility training. You don’t need premium brands or special features for effective stretching.

What’s included in typical sets:

  • 3-5 bands in different resistance levels
  • Instruction sheet or access to online exercise videos
  • Carrying bag (optional but convenient)
  • Door anchor (useful but not essential for most stretches)

Avoid buying single heavy-resistance bands marketed for strength training. For flexibility work, you want lighter resistance options. Sets labeled “therapy bands,” “stretch bands,” or “yoga bands” typically include appropriate resistance levels for seniors.

Replace bands every 6-12 months or when you notice signs of wear (cracks, loss of elasticity, discoloration). Proper storage extends band lifeโ€”keep them away from direct sunlight and extreme temperatures, and store them loosely rather than tightly wound.

Stretch Band Exercises Seniors Can Do Sitting Down

Seated stretch band exercises provide all the flexibility benefits of standing stretches while eliminating balance concerns and reducing stress on weight-bearing joints. Most stretch band exercises adapt easily to a seated position, making them accessible for people with mobility limitations.

Effective seated stretch band exercises:

Seated Hamstring Stretch
Sit toward the front edge of a sturdy chair with one leg extended, heel on the floor. Loop the band around the ball of your foot and hold both ends. Gently pull the band toward you, feeling a stretch along the back of your thigh. Keep your back straight [1].

Hold 20-30 seconds, repeat 2-3 times per leg.

Seated Figure Four Hip Stretch
Sit upright and cross one ankle over the opposite knee. Loop the band around the elevated foot and gently pull toward your chest, feeling a stretch in the hip and glute. This addresses tight hips without getting on the floor [1].

Hold 20-30 seconds per side.

Seated Chest Opener
Hold the band behind your back with both hands. Gently pull the band apart while squeezing shoulder blades together, opening the chest. This counters rounded shoulders from sitting [3].

Hold 15-20 seconds, repeat 3-4 times.

Seated Side Bend
Hold the band overhead with both hands, arms extended. Gently lean to one side, feeling a stretch along the opposite side of your torso. The band helps guide the movement and maintain arm position.

Hold 15-20 seconds per side, repeat twice.

Seated Ankle Stretch
Loop the band around one foot while keeping that leg extended. Point your toes by pulling the band, then flex your foot by pulling toes toward you. This maintains ankle mobility [3].

Perform 10-12 repetitions in each direction.

Seated Shoulder Rolls
Hold the band with both hands at shoulder width. Raise arms overhead slowly, letting the band guide the movement. Lower behind your head if comfortable, then return to start. This maintains shoulder flexibility [2].

Perform 5-8 slow repetitions.

Chair selection matters:
Use a sturdy chair without wheels, with a firm seat and good back support. Kitchen or dining chairs work better than soft couches or recliners. Sit toward the front edge for exercises requiring leg extension.

For more seated exercise options, see our comprehensive guide to seated chair exercises.

Conclusion

Stretch band exercises offer seniors a practical, low-impact method to improve flexibility and range of motion without requiring complex equipment or advanced fitness levels. The controlled resistance these bands provide makes stretching more effective than static methods alone, while seated options ensure accessibility for people with balance or mobility concerns.

Starting with light resistance bands and practicing three to four times per week produces noticeable improvements in flexibility within four to six weeks. Most exercises adapt to individual limitations, making them suitable even for people managing arthritis, recovering from surgery, or dealing with chronic painโ€”though medical clearance remains important for anyone with significant health concerns.

The key to success is consistency rather than intensity. Short, regular sessions using proper technique and appropriate resistance levels produce better long-term results than sporadic aggressive stretching. Focus on exercises that address your specific tight areas, breathe steadily throughout each stretch, and progress gradually as your flexibility improves.

Next steps to get started:

  1. Purchase a basic stretch band set with light to medium-light resistance levels ($10-25)
  2. Choose 4-6 exercises that target your tightest areas (shoulders, hips, hamstrings are common)
  3. Schedule three 15-20 minute sessions per week at consistent times
  4. Warm up with 5 minutes of gentle movement before each session
  5. Hold each stretch 15-30 seconds and repeat 2-3 times
  6. Track your progress by noting which daily activities feel easier

For a well-rounded approach to healthy aging, combine stretch band flexibility work with strength exercises and balance training. Together, these three components support the mobility and independence that make daily life easier and more comfortable.

References

[1] A Personal Trainer Recommends This Three Move Stretch Routine To All Her Senior Clients And They Can All Be Done Either Seated Or Standing – https://www.fitandwell.com/exercise/flexibility/a-personal-trainer-recommends-this-three-move-stretch-routine-to-all-her-senior-clients-and-they-can-all-be-done-either-seated-or-standing/?utm_source=openai

[2] This Four Move Resistance Band Workout For Seniors Will Improve Mobility And Build Functional Strength – https://www.fitandwell.com/exercise/home-workouts/this-four-move-resistance-band-workout-for-seniors-will-improve-mobility-and-build-functional-strength/?utm_source=openai

[3] Chair Exercises For Seniors – https://health.clevelandclinic.org/chair-exercises-for-seniors/?utm_source=openai

[4] Resistance Band Exercises For Seniors – https://www.hingehealth.com/resources/articles/resistance-band-exercises-for-seniors/?utm_source=openai

[6] 10 Flexibility Stretching Exercises For Seniors – https://www.gogograndparent.com/blog/10-flexibility-stretching-exercises-for-seniors?utm_source=openai

[7] Full Workout With Stretch Band For Seniors – https://morelifehealth.com/articles/full-workout-with-stretch-band-for-seniors?utm_source=openai

[8] Exercises To Increase Flexibility – https://eldergym.com/exercises-to-increase-flexibility/?utm_source=openai


This article is part of our Stretching & Flexibility Exercises for Seniors series.

Share This Page

Seated Dumbbell Exercises For Seniors: A Complete Chair-Based Strength Routine

Seated Dumbbell Exercises For Seniors: A Complete Chair-Based Strength Routine

Last updated: June 22, 2026

Quick Answer

Seated dumbbell exercises for seniors provide a complete, effective strength routine using a sturdy chair as the training base. This format targets the upper body, core, and lower body without requiring balance or standing stability, making it suitable for those with mobility concerns, balance issues, or anyone who prefers seated training. The routine functions as a standalone workout, not a modified version of standing exercises.

Prefer to mix in standing exercises as well? See our complete dumbbell workout for seniors for standing-based movement patterns.

Key Takeaways

  • Seated dumbbell training is a legitimate strength format that builds muscle and supports everyday function
  • A sturdy chair without wheels provides stable support for pressing, pulling, and lifting movements
  • Upper body exercises include shoulder presses, bicep curls, tricep extensions, and rows
  • Core work can be performed seated using weighted twists, side bends, and controlled lifts
  • Lower body exercises like weighted knee extensions and seated marches add leg strength
  • Start with 3-5 pound dumbbells and progress based on comfort and control
  • Two to three sessions per week allows adequate recovery between workouts
Key Takeaways

What Makes Seated Dumbbell Training Effective for Seniors?

Seated dumbbell exercises for seniors deliver measurable strength gains without requiring standing balance or floor transitions. Research shows that seated strength training can reduce body fat, improve cardiovascular health, and lower injury risk while building functional muscle mass[3].

The chair provides consistent support throughout each movement, allowing focus on proper form and controlled lifting. This setup removes the balance component that can limit weight selection or create safety concerns during standing exercises.

Key advantages of the seated format:

  • Eliminates fall risk during lifting movements
  • Allows heavier weights than standing exercises for some movements
  • Reduces fatigue from prolonged standing
  • Provides back support for pressing movements
  • Enables training during recovery from lower body injuries
  • Works well for those with arthritis, neuropathy, or balance disorders

Choose a chair with a flat, firm seat and a straight back. Avoid chairs with wheels, swivel bases, or excessive padding that shifts during movement.

How to Set Up Your Space for Seated Dumbbell Work

Place a sturdy chair on a non-slip surface or mat. The chair should not slide when pressing weights overhead or leaning forward during rows. Position the chair away from walls or furniture to allow arm movement in all directions.

Setup checklist:

  • Chair height allows feet to rest flat on the floor with knees at 90 degrees
  • Seat depth supports thighs without pressure behind the knees
  • Backrest is straight and firm, not reclined
  • No armrests that block side or front arm movements
  • Clear space of 3-4 feet around the chair
  • Dumbbells within easy reach before starting
  • Water and towel nearby

Start with one pair of light dumbbells (3-5 pounds). Add a second pair (8-10 pounds) as strength improves. Store weights on a low shelf or mat beside the chair rather than bending to pick them up from the floor.

For more guidance on chair-based training setups, see our senior chair exercise routine guide.

Upper Body Exercises: Building Shoulder, Arm, and Back Strength

Upper body movements form the core of seated dumbbell exercises for seniors. These exercises strengthen muscles used for lifting groceries, reaching overhead, and pushing or pulling objects.

Seated Shoulder Press

Sit upright with feet flat. Hold dumbbells at shoulder height with palms facing forward. Press both weights straight up without locking elbows at the top. Lower back to shoulder height with control. The shoulder press targets deltoids and upper trapezius muscles[3].

Perform 8-10 repetitions for 2-3 sets. Rest 60-90 seconds between sets.

Seated Bicep Curl

Hold dumbbells at your sides with palms facing inward. Bend one elbow, lifting the weight toward your chest while rotating your palm upward. Lower the weight back down, then repeat with the other arm. This exercise strengthens the biceps and forearm muscles used for carrying and lifting[4].

Complete 8-12 repetitions per arm for 2 sets.

Seated Tricep Extension

Hold one dumbbell with both hands. Raise it overhead, then bend elbows to lower the weight behind your head. Keep upper arms still and close to your ears. Press the weight back up by straightening your elbows. This targets the triceps, which support pushing movements.

Perform 8-10 repetitions for 2 sets.

Seated Row

Sit near the edge of the chair. Hold dumbbells in front of your chest with arms extended and elbows slightly bent. Pull the weights back toward your ribs, bringing shoulder blades together. Return to the starting position. This strengthens the upper back and improves posture[5].

Complete 10-12 repetitions for 2-3 sets.

For additional upper body options, explore our arm chair exercises for seniors.

Seated Row

Core Exercises: Seated Movements for Trunk Strength

Core strength supports balance, posture, and everyday movements like bending and twisting. Seated dumbbell work engages core muscles through controlled rotation and side bending.

Seated Russian Twist

Hold one dumbbell with both hands at chest level. Sit upright with feet flat. Rotate your upper body to one side, keeping hips and legs still. Return to center, then rotate to the other side. This exercise strengthens obliques and improves rotational control[1].

Perform 10 twists per side (20 total) for 2 sets.

Weighted Side Bend

Sit upright holding one dumbbell in your right hand. Raise your left arm overhead. Bend slowly to the right side as far as comfortable, feeling the stretch along your left side. Return to upright, then repeat on the other side. This targets obliques and lateral trunk muscles[6].

Complete 8-10 bends per side for 2 sets.

Seated Wood Chop

Hold one dumbbell with both hands. Start with the weight beside your right hip. Lift the weight diagonally across your body toward your left shoulder, rotating your trunk as you move. Lower back to the starting position. This functional movement mimics lifting and reaching patterns.

Perform 10 repetitions per side for 2 sets.

For more core-focused work, see our guide to abdominal chair exercises for seniors.

Lower Body Exercises: Strengthening Legs While Seated

Lower body work from a seated position focuses on controlled lifts and holds that build quadriceps, hamstrings, and hip muscles.

Weighted Knee Extension

Sit upright with a light dumbbell held between your feet or a single weight resting on top of one foot. Extend one leg straight out in front of you, hold for 2 seconds, then lower it back down. This exercise strengthens quadriceps and supports knee stability[8].

Perform 10-12 repetitions per leg for 2 sets.

Seated March with Weights

Hold light dumbbells at your sides. Lift one knee toward your chest while keeping your back straight. Lower it, then lift the other knee. This movement strengthens hip flexors and improves hip mobility[6].

Complete 10-15 marches per leg for 2 sets.

Weighted Ankle Flex

Sit with legs extended. Place a light dumbbell on top of one foot. Point your toes forward, then flex your foot back toward your shin. This small movement strengthens ankle muscles and improves lower leg control.

Perform 12-15 repetitions per foot for 2 sets.

For additional lower body training options, review our leg strengthening exercises for seniors.

Weighted Ankle Flex

A Complete Seated Dumbbell Routine for Seniors

This routine combines upper body, core, and lower body exercises into a balanced 25-30 minute session. Perform this workout two to three times per week with at least one rest day between sessions[1].

Warm-up (5 minutes):

  • Seated arm circles: 10 forward, 10 backward
  • Shoulder rolls: 10 repetitions
  • Seated marches (no weight): 20 total
  • Ankle circles: 10 per direction, each foot

Main Workout:

ExerciseSetsRepsRest
Seated Shoulder Press2-38-1060-90 sec
Seated Bicep Curl28-12 per arm60 sec
Seated Row2-310-1260-90 sec
Seated Russian Twist210 per side45 sec
Weighted Side Bend28-10 per side45 sec
Weighted Knee Extension210-12 per leg60 sec
Seated March with Weights210-15 per leg45 sec

Cool-down (5 minutes):

  • Seated forward fold: hold 20-30 seconds
  • Seated spinal twist: 15 seconds per side
  • Shoulder stretches: 20 seconds per position
  • Deep breathing: 10 slow breaths

Progress by adding one repetition per week or increasing weight by 1-2 pounds when current weights feel comfortable for all prescribed repetitions.

Choosing the Right Dumbbell Weight

Start with 3-5 pound dumbbells for most exercises. The final two repetitions of each set should feel challenging but not impossible. If form breaks down before reaching the target repetition range, the weight is too heavy.

Weight selection guidelines:

  • Shoulder press: 3-8 pounds depending on current strength
  • Bicep curls: 3-8 pounds
  • Tricep extensions: 3-5 pounds (this exercise requires less weight)
  • Rows: 5-10 pounds
  • Core exercises: 5-8 pounds
  • Lower body exercises: 3-5 pounds

Increase weight when you can complete all sets with 2-3 repetitions remaining before fatigue. Add 1-2 pounds at a time rather than making large jumps.

Adjustable dumbbells with 1-pound increments work well for gradual progression. Fixed-weight dumbbells in 2-pound increments (3, 5, 8, 10 pounds) provide enough variety for most seniors.

For broader strength training context, see our dumbbell workout for seniors overview.

Safety Considerations and Common Mistakes

Seated training reduces fall risk but still requires attention to form and breathing. Avoid holding your breath during lifts, which can spike blood pressure. Exhale during the effort phase (lifting or pressing) and inhale during the return phase.

Common mistakes to avoid:

  • Leaning too far forward or backward during presses
  • Using momentum to swing weights rather than controlled lifting
  • Gripping dumbbells too tightly (causes forearm fatigue)
  • Rounding the back during rows or core exercises
  • Locking elbows or knees at full extension
  • Training through sharp pain (dull muscle fatigue is normal)

Stop any exercise that causes joint pain, dizziness, or chest discomfort. Consult a doctor before starting this routine if you have uncontrolled high blood pressure, recent surgery, or active joint inflammation[5].

Use a mirror or record yourself to check form during the first few sessions. The chair back should support your lower back during pressing movements, but avoid leaning heavily against it during rows or core work.

How Seated Dumbbell Training Fits Into Weekly Activity

Seated dumbbell exercises for seniors work well as a standalone strength routine or as part of a broader weekly plan. The American guidelines recommend strength training at least twice per week, which this routine satisfies[3].

Sample weekly schedule:

  • Monday: Seated dumbbell routine (30 minutes)
  • Tuesday: Walking or seated cardio (20-30 minutes)
  • Wednesday: Rest or gentle stretching
  • Thursday: Seated dumbbell routine (30 minutes)
  • Friday: Balance exercises or walking (20-30 minutes)
  • Weekend: Active rest (light activity, yard work, recreational movement)

Combine seated strength work with other chair-based movements like seated workouts for seniors on alternate days for variety without requiring standing exercises.

Tracking Progress and Making Adjustments

Record weights, sets, and repetitions for each session. Note how exercises feel and any modifications made. Progress appears as increased repetitions, heavier weights, or improved form over 4-8 weeks.

Signs of effective training:

  • Completing target repetitions with better control
  • Less fatigue during daily activities that use similar movements
  • Improved posture throughout the day
  • Ability to lift or carry objects with more confidence
  • Reduced joint stiffness after regular training

Adjust the routine every 6-8 weeks by changing exercise order, adding new movements, or modifying repetition ranges. This prevents adaptation and maintains progress.

If progress stalls for three consecutive weeks, review form, ensure adequate protein intake (0.5-0.7 grams per pound of body weight daily), and verify sufficient rest between sessions.

Conclusion

Seated dumbbell exercises for seniors provide a complete strength routine that builds functional muscle without requiring standing balance or complex movements. This format serves as a primary training method, not a temporary modification, for anyone who prefers or needs seated exercise.

Start with the basic routine outlined here, using light weights and focusing on controlled form. Progress gradually by adding repetitions or weight as strength improves. Train two to three times per week, allowing rest days for recovery.

The chair-based format removes barriers that prevent many seniors from maintaining regular strength training. Set up your space, choose appropriate weights, and begin with the first session this week.

For additional seated training options, explore our complete guide to seated chair exercises.

References

[1] Try This 10 Minute Chair Pilates Routine To Improve Core Strength After 60 – https://www.tomsguide.com/wellness/workouts/try-this-10-minute-chair-pilates-routine-to-improve-core-strength-after-60?utm_source=openai

[2] Im A Personal Trainer Who Works With Seniors This Is The One Exercise I Make Sure All Of My Clients Can Do – https://www.tomsguide.com/wellness/workouts/im-a-personal-trainer-who-works-with-seniors-this-is-the-one-exercise-i-make-sure-all-of-my-clients-can-do?utm_source=openai

[3] Seated Strength Training – https://www.webmd.com/fitness-exercise/features/seated-strength-training?utm_source=openai

[4] Chair Exercises For Seniors – https://www.medicalnewstoday.com/articles/chair-exercises-for-seniors?utm_source=openai

[5] Chair Exercises For Seniors Boosting Strength Flexibility And Stamina – https://www.health.harvard.edu/exercise-and-fitness-1/chair-exercises-for-seniors-boosting-strength-flexibility-and-stamina?utm_source=openai

[6] Chair Exercises For Seniors – https://health.clevelandclinic.org/chair-exercises-for-seniors?utm_source=openai

[7] Easy Seated And Bed Based Exercises For Seniors – https://keystone.health/easy-seated-and-bed-based-exercises-for-seniors?utm_source=openai

[8] Chair Exercises For Seniors – https://www.healthline.com/health/senior-health/chair-exercises-for-seniors?utm_source=openai


This article is part of our chair-based exercises for seniors series.

Share This Page

Core Muscle Exercises For Seniors: Better Balance, Posture, and Stability

Professional () hero image featuring 'Core Muscle Exercises For Seniors: Better Balance, Posture, and Stability' in extra

Core muscle exercises for seniors strengthen the trunk muscles that support the spine, maintain upright posture, and provide stability during everyday movements. These muscles wrap around the midsection from the ribcage to the pelvis and work constantly during walking, turning, reaching, and getting up from chairs.

A strong core reduces strain on the lower back, improves balance during direction changes, and makes daily tasks easier. Unlike general strength work, core training focuses specifically on trunk stabilityโ€”the ability to hold the body steady while the arms and legs move. This stability matters when carrying groceries, bending to pick something up, or standing on one foot to put on shoes.

The exercises in this guide target the deep core muscles that protect the spine and the outer muscles that control posture and movement. Most can be done seated or standing, with floor work included as an option for those who can get down and up safely.

Key Takeaways

  • Core muscles support the spine and trunk, providing stability during all daily movements including walking, bending, and reaching
  • Trunk stability reduces fall risk by improving balance during direction changes and uneven surfaces
  • Seated and standing exercises work just as well as floor exercises for building core strength and control
  • Proper breathing and alignment matter more than exercise difficulty or repetition count
  • Core training protects the lower back by distributing load across multiple muscle groups instead of relying on the spine alone

What Core Muscles Do and Why They Matter

The core includes several layers of muscles that work together to support and move the trunk. The deepest layerโ€”the transverse abdominisโ€”acts like a corset, tightening around the midsection to stabilize the spine. The multifidus muscles run along the spine and control small movements between vertebrae. The pelvic floor muscles support the organs and work with the deep abdominals during lifting and straining.

Outer core muscles include the rectus abdominis (front), obliques (sides), and erector spinae (back). These muscles bend, twist, and extend the trunk while the deep muscles keep everything stable.

Why trunk stability matters for daily function:

  • Walking and turning require core muscles to keep the upper body steady while the legs move
  • Reaching overhead needs trunk stability to prevent excessive arching in the lower back
  • Getting up from chairs relies on core engagement to transfer weight forward before standing
  • Bending to lift objects distributes force across core muscles instead of loading the spine
  • Maintaining balance on uneven ground depends on quick core adjustments to keep the body centered

When core muscles weaken, other areas compensate. The lower back may take on too much load, leading to stiffness or pain. Balance becomes less reliable during quick movements. Posture changes as the trunk loses support, often resulting in a forward lean or rounded shoulders.

Core Muscle Exercises For Seniors: Seated and Standing Options

These exercises build trunk stability without requiring floor work. They focus on controlled movement, proper breathing, and maintaining neutral spine alignment.

Seated Core Exercises

Seated Marching
Sit toward the front of a sturdy chair with feet flat on the floor. Place hands on hips or the chair seat. Slowly lift one knee a few inches, hold for two seconds, then lower. Alternate legs for 10-12 repetitions per side. Keep the trunk uprightโ€”avoid leaning back or rounding forward.

This exercise engages the lower abdominals and hip flexors while requiring trunk stability to prevent swaying.

Seated Torso Rotation
Sit upright with feet flat. Cross arms over chest or hold a small ball at chest height. Rotate the upper body to the right, hold for two seconds, return to center, then rotate left. Complete 8-10 rotations per side. Move from the waist, not the shoulders, and keep hips facing forward.

Rotation exercises strengthen the obliques and improve the twisting movements needed for reaching behind or looking over the shoulder.

Seated Side Bend
Sit tall with feet flat and hands resting on thighs. Slide the right hand down the right leg toward the knee, bending the trunk to the side. Hold for two seconds, return to center, then repeat on the left. Complete 8-10 bends per side. Avoid leaning forward or backโ€”move directly to the side.

Standing Core Exercises

Standing Pelvic Tilt
Stand with back against a wall, feet about six inches away from the baseboard. Flatten the lower back against the wall by gently tilting the pelvis forward. Hold for five seconds, then release. Repeat 8-10 times.

This movement teaches core engagement and helps correct excessive lower back arch.

Standing Knee Lift with Hold
Stand near a counter or sturdy surface for light support. Lift one knee toward chest height, hold for 3-5 seconds while keeping the trunk upright, then lower slowly. Complete 8-10 lifts per leg. Focus on preventing the trunk from leaning backward as the knee rises.

Modified Plank at Counter
Stand facing a kitchen counter. Place hands on the counter edge, step feet back until the body forms a straight line from head to heels at about a 45-degree angle. Hold this position for 10-20 seconds, keeping core engaged and avoiding sagging in the middle. Rest and repeat 3-4 times.

Counter planks build overall core endurance with less intensity than floor planks.

Standing Core Exercises

Floor-Based Core Muscle Exercises For Seniors (Optional)

Floor-Based Core Muscle Exercises For Seniors (Optional)

For those who can safely get down to the floor and back up, these exercises provide additional core strengthening options.

Bridge
Lie on back with knees bent and feet flat on the floor, hip-width apart. Arms rest at sides. Press through the feet to lift hips until the body forms a straight line from knees to shoulders. Hold for 5-10 seconds, then lower slowly. Repeat 8-10 times.

Bridges strengthen the glutes, hamstrings, and lower back while requiring core stability to prevent arching.

Dead Bug (Modified)
Lie on back with knees bent and feet flat. Engage the core to press the lower back gently toward the floor. Slowly extend one leg until the heel hovers a few inches above the floor, hold for two seconds, then return. Alternate legs for 8-10 repetitions per side. Keep the lower back stable throughout.

This exercise challenges core stability while moving the legs independently.

Bird Dog (Modified)
Start on hands and knees with hands under shoulders and knees under hips. Engage the core to keep the back flat. Extend the right arm forward and hold for 3-5 seconds, then return. Repeat with the left arm, then alternate. Complete 6-8 repetitions per side. Once comfortable, add leg extension (opposite arm and leg).

Bird dog improves coordination between core muscles and limbs.

How to Practice Core Muscle Exercises For Seniors Safely

Start with breathing and alignment. Before beginning any exercise, take a breath and find a neutral spine positionโ€”not overly arched or rounded. Engage the core by gently drawing the navel toward the spine without holding the breath.

Progress gradually. Begin with seated exercises and shorter hold times. Add standing exercises once trunk control improves. Floor exercises are optional and should only be attempted if getting up and down is safe.

Quality over quantity. Five controlled repetitions with proper form build more strength than twenty repetitions done with compensation or momentum.

Watch for these common mistakes:

  • Holding the breath during exercises (breathe normally throughout)
  • Moving too quickly or using momentum
  • Allowing the lower back to arch excessively during leg movements
  • Leaning or shifting weight instead of engaging core muscles
  • Pushing through pain rather than working within comfortable ranges

When to modify or skip exercises:

  • Recent back surgery or injury requires medical clearance before core training
  • Sharp pain during any movement means stop and reassess form or choose a different exercise
  • Dizziness during standing exercises suggests starting with seated versions
  • Difficulty getting up from the floor means focusing on seated and standing options only

Connecting Core Exercises to Everyday Movement

Core muscle exercises for seniors translate directly to daily activities. The trunk stability practiced during seated marching helps when walking on uneven sidewalks. The control developed through standing knee lifts makes stepping over obstacles easier. The strength built with bridges supports getting up from low chairs or the toilet.

Practical applications:

  • Carrying groceries uses the same core engagement as standing exercises with added load
  • Vacuuming or sweeping requires trunk rotation and stability similar to seated torso rotations
  • Getting dressed involves balance and core control practiced during standing knee lifts
  • Gardening or yard work demands the bending and lifting patterns supported by bridge and plank exercises

Practice engaging the core during daily tasks by taking a breath, finding neutral spine alignment, and gently tightening the midsection before movement. This habit reinforces the connection between exercise and function.

Connecting Core Exercises to Everyday Movement

Building a Core Exercise Routine

A basic routine includes 4-6 exercises covering different movement patterns: forward/back (marching, bridge), rotation (torso twists), side bending, and stability (planks, dead bug).

Sample routine (15-20 minutes):

  1. Seated marching โ€“ 10 per leg
  2. Seated torso rotation โ€“ 10 per side
  3. Standing pelvic tilt โ€“ 10 repetitions
  4. Standing knee lift with hold โ€“ 8 per leg
  5. Modified plank at counter โ€“ 3 holds of 15 seconds
  6. Bridge (if doing floor work) โ€“ 8 repetitions

Complete this routine 3-4 times per week with at least one rest day between sessions. Core muscles recover quickly, but consistent practice matters more than daily training.

Add repetitions or hold times as exercises become easier. Progress to more challenging versions (moving from counter plank to table-height plank, for example) only after mastering current versions with good form.

Combine core exercises with other movement practicesโ€”walking for cardiovascular health, strength training for major muscle groups, and balance exercises for fall prevention. Core strength supports all these activities and improves with varied movement patterns.

Conclusion

Core muscle exercises for seniors strengthen the trunk muscles that control posture, protect the lower back, and provide stability during daily movements. Seated and standing exercises build this strength without requiring floor work, making core training accessible regardless of mobility level.

Start with basic exercises like seated marching and standing pelvic tilts. Focus on proper breathing, neutral spine alignment, and controlled movement. Progress gradually by adding repetitions, increasing hold times, or trying more challenging variations.

Practice core engagement during daily activities to reinforce the connection between exercise and function. Notice how trunk stability makes carrying items easier, improves balance during turns, and reduces strain during bending or reaching.

Choose 4-6 exercises that cover different movement patterns and practice them 3-4 times per week. Consistency builds strength over time, and that strength translates directly to better balance, improved posture, and more confident movement through daily life.


This article is part of our General Strength Training series.

Share This Page