Tag Archives: flexibility for seniors

Glute Stretches For Seniors: Why They Tighten and How to Release Them

Glute Stretches For Seniors: Why They Tighten and How to Release Them

Last updated: July 15, 2026

Quick Answer

Glute stretches for seniors help release tightness caused by prolonged sitting and reduced activity, which can lead to lower back pain, hip discomfort, and difficulty with daily movements like standing from chairs or walking. Regular stretching of the gluteal muscles improves mobility, reduces pain, and maintains independence in everyday tasks.

Key Takeaways

  • Tight glutes are common after age 50 due to extended sitting, reduced activity, and natural muscle changes
  • Tight gluteal muscles contribute directly to lower back pain, hip stiffness, and walking difficulties
  • Effective glute stretches for seniors include figure-4 stretch, seated glute stretch, and supine knee-to-chest variations
  • Seniors can perform most glute stretches while seated in a chair, making them accessible for those with limited mobility
  • Stretching glutes 3-5 times per week for 20-30 seconds per stretch produces noticeable improvement within 2-4 weeks
  • Static stretches work best for seniors, held gently without bouncing or forcing the movement
  • Those with arthritis should use modified positions and avoid deep hip flexion that causes pain
  • Glute stretches that require lying on the floor can be adapted to bed or chair positions
Key Takeaways

Why Do Glutes Get Tight as You Age

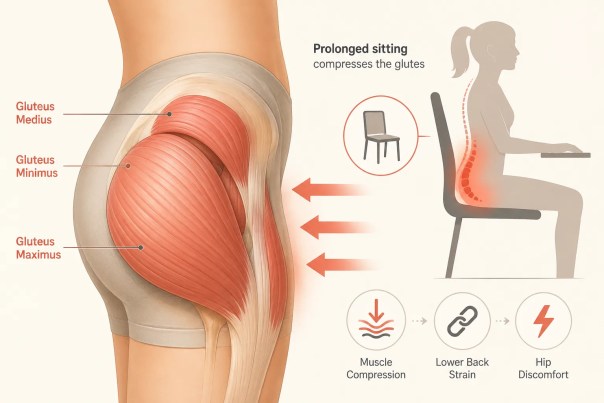
The gluteal muscles tighten with age primarily because of prolonged sitting and decreased daily activity, which cause the muscle fibers to shorten and lose flexibility. When you sit for extended periods, the glutes remain in a compressed, shortened position for hours at a time, and over months and years, they adapt to this position as their new normal length.

Beyond sitting, several age-related factors contribute to glute tightness:

  • Reduced overall movement: Walking less, climbing fewer stairs, and avoiding activities that require hip extension all allow the glutes to weaken and tighten
  • Muscle fiber changes: After age 50, muscle tissue naturally loses some elasticity and becomes stiffer if not regularly stretched
  • Compensation patterns: When other muscles weaken (like the core or hip flexors), the glutes often tighten to compensate for instability
  • Inflammation: Low-grade inflammation in joints and connective tissue becomes more common with age, contributing to stiffness

The glutes consist of three muscles (gluteus maximus, medius, and minimus) that work together to extend the hip, stabilize the pelvis, and support upright posture. When these muscles tighten, they pull on the pelvis and lower spine, creating a chain reaction of discomfort throughout the lower body.

Can Tight Glutes Cause Back Pain in Older Adults

Yes, tight glutes directly cause lower back pain in older adults by altering pelvic alignment and forcing the lower back muscles to work harder during everyday movements. When the gluteal muscles are tight and weak, they cannot properly stabilize the pelvis, so the lumbar spine compensates by taking on extra load during activities like standing, walking, or bending.

The connection works like this: tight glutes pull the pelvis into a posterior tilt (tucking under), which flattens the natural curve of the lower back. This position strains the lumbar discs, facet joints, and surrounding muscles. Additionally, when glutes don’t fire properly during hip extension, the lower back muscles overwork to complete movements that should primarily use the hips.

Research shows that addressing glute tightness and weakness often reduces chronic lower back pain without other interventions. Many seniors who stretch their glutes regularly report significant decreases in daily back discomfort within a few weeks.

Can Glute Stretches Help With Hip Pain

Glute stretches effectively reduce hip pain in seniors by releasing tension in muscles that directly attach to or cross the hip joint. The gluteus medius and minimus, in particular, attach to the outer hip and can cause pain that feels like it’s coming from the hip joint itself when they’re tight or contain trigger points.

Hip pain from tight glutes typically presents as:

  • Deep aching in the outer hip or buttock
  • Pain when lying on the affected side
  • Discomfort when standing from a seated position
  • Stiffness when walking after sitting
  • Limited range of motion when lifting the leg to the side

Stretching releases this tension and restores normal muscle length, which reduces the pulling force on the hip structures. For many seniors, what feels like hip arthritis pain is actually muscular tightness that responds well to consistent stretching. However, if hip pain persists despite regular stretching, or if it’s accompanied by grinding, clicking, or severe limitation, evaluation by a healthcare provider is necessary to rule out joint problems.

For additional ways to maintain hip and leg function, see our guide to leg strengthening exercises for seniors.

Best Glute Stretches For Seniors With Limited Mobility

Seniors with limited mobility can effectively stretch their glutes using chair-based and bed-based positions that don’t require getting down on the floor. These modifications provide the same muscle release as traditional stretches while accommodating balance concerns, joint limitations, or difficulty transitioning to and from the floor.

Seated Figure-4 Stretch

Sit in a sturdy chair with feet flat on the floor. Place your right ankle on your left knee, creating a “4” shape with your legs. Gently press down on your right knee while keeping your back straight. Lean forward slightly from the hips (not the waist) until you feel a stretch in your right glute. Hold for 20-30 seconds, then switch sides.

Modification: If you cannot reach your ankle, place your foot on a low stool instead of your opposite knee.

Seated Knee-to-Chest

While seated, lift your right knee toward your chest and hold it with both hands behind the thigh (not on top of the knee). Pull gently until you feel a stretch in your right glute and lower back. Hold for 20-30 seconds, then switch sides.

Modification: Use a resistance band or towel looped around your thigh if you cannot comfortably reach with your hands.

Supine Glute Stretch (Bed Version)

Lie on your back in bed with knees bent and feet flat. Cross your right ankle over your left knee. Thread your hands through the opening and clasp behind your left thigh. Pull your left thigh toward your chest until you feel a stretch in your right glute. Hold for 20-30 seconds, then switch sides.

This stretch works identically whether performed in bed or on a yoga mat, making it accessible for those who can lie down but struggle with floor transitions.

For more seated exercise options that complement glute stretching, explore our seated chair exercises for seniors.

Supine Glute Stretch (Bed Version)

Glute Stretches Seniors Can Do Sitting Down

Seated glute stretches provide effective muscle release while maintaining stability and safety in a chair. These stretches work well for seniors who spend significant time sitting or who need to stretch during breaks from desk work or television watching.

Seated Piriformis Stretch: Sit with your right ankle crossed over your left knee. Place your right hand on your right knee and gently press it toward the floor while keeping your back straight. You should feel the stretch deep in your right glute. Hold for 20-30 seconds and repeat on the other side.

Seated Spinal Twist with Glute Stretch: Sit sideways in a chair with your right hip against the backrest. Twist your torso to the right and hold the back of the chair with both hands. This position stretches the left glute and lower back. Hold for 20-30 seconds, then switch sides.

Seated Hip Hike: While sitting, lift your right hip up toward your ribs (as if shortening that side of your body), then lower it back down. This movement stretches and activates the glutes alternately. Perform 10-12 repetitions on each side.

These seated variations can be performed multiple times throughout the day without changing clothes or using equipment, making them practical for daily use.

Glute Stretches For Seniors After Sitting All Day

After prolonged sitting, specific glute stretches help reverse the shortened position and restore normal muscle length. These stretches target the compression and tightness that accumulates during extended periods in a chair.

Standing Glute Stretch: Stand facing a counter or sturdy table. Place your right ankle on the surface (knee bent), creating a figure-4 position while standing. Keep your standing leg straight and lean forward from your hips until you feel a stretch in your right glute. Hold for 20-30 seconds, then switch sides.

Doorway Hip Flexor and Glute Stretch: Stand in a doorway with your right foot forward and left foot back in a lunge position. Tuck your pelvis under (posterior tilt) and squeeze your left glute while keeping your left knee straight. This stretches the hip flexor while activating the glute. Hold for 20-30 seconds, then switch sides.

Supine Knee Rocks: Lie on your back with knees bent and feet flat. Let both knees fall to the right side while keeping your shoulders on the floor. Hold for 20-30 seconds, feeling the stretch in your left glute and lower back. Return to center and repeat on the other side.

Perform this sequence after long periods of sitting (such as after meals, long car rides, or work sessions) to prevent the accumulation of tightness. Consistency matters more than duration, three 30-second stretches spread throughout the day work better than one long session.

For a complete approach to staying active throughout the day, see our daily activities for seniors guide.

How Often Should Seniors Stretch Their Glutes

Seniors should stretch their glutes 3-5 times per week for maintenance, or daily if experiencing tightness, pain, or limited mobility. Each stretching session should include 2-3 different glute stretches, held for 20-30 seconds each, and repeated 2-3 times per side.

Frequency guidelines based on goals:

  • Maintenance (no current pain): 3 times per week, 2-3 stretches per session
  • Addressing tightness: 5-6 times per week, 3-4 stretches per session
  • Managing pain: Daily, 4-5 stretches per session, potentially twice per day

The best times to stretch are after light activity when muscles are warm, such as after a walk, after a warm shower, or following gentle exercises for seniors. Avoid aggressive stretching first thing in the morning when muscles are stiffest and cold.

Consistency produces better results than intensity. Gentle, regular stretching gradually lengthens muscle fibers and resets their resting length, while aggressive stretching can cause muscle guarding and actually increase tightness.

How Long Does It Take to Loosen Tight Glutes

Most seniors notice initial improvement in glute tightness within 2-3 weeks of consistent stretching, with significant changes occurring after 4-6 weeks of regular practice. The timeline depends on the severity of tightness, frequency of stretching, and whether you address contributing factors like prolonged sitting.

Typical progression:

  • Week 1-2: Improved awareness of tightness; stretches may feel uncomfortable but should not cause pain
  • Week 3-4: Noticeable increase in range of motion; reduced stiffness when standing from sitting
  • Week 5-8: Measurable improvement in flexibility; decreased back or hip pain; easier movement during daily activities
  • Week 9+: Maintenance phase; continued improvement if stretching continues

Factors that speed up progress include combining stretching with strengthening exercises, reducing sitting time, staying hydrated, and maintaining consistency. Factors that slow progress include inconsistent stretching, continuing to sit for long periods without breaks, and stretching too aggressively (which causes muscle guarding).

If you see no improvement after 4-6 weeks of consistent daily stretching, consult a physical therapist to assess whether other factors (such as joint problems, nerve issues, or compensation patterns) are preventing progress.

How Long Does It Take to Loosen Tight Glutes

Glute Stretches For Seniors With Arthritis

Seniors with arthritis can safely stretch their glutes by using modified positions that avoid deep hip flexion and by working within a comfortable range of motion. Arthritis in the hips, knees, or lower back requires adjustments to standard stretches, but the benefits of maintaining glute flexibility remain important for managing pain and preserving function.

Modified stretches for arthritis:

Gentle Supine Knee-to-Chest: Lie on your back and bring one knee toward your chest only as far as comfortable, using your hands to support behind the thigh (never pulling on the knee joint itself). Hold for 15-20 seconds. This stretch is gentler than the figure-4 variation and puts less stress on the hip joint.

Seated Glute Stretch with Towel: Sit in a chair and place your right foot on a low stool. Loop a towel or resistance band around your right thigh and gently pull it toward you while keeping your back straight. This provides the stretch without requiring deep hip flexion. Hold for 20-30 seconds per side.

Standing Glute Stretch at Counter: Place your right foot on a low step or stool (6-8 inches high) in front of you. Keep your knee slightly bent and lean forward from your hips just until you feel a gentle stretch. This modification reduces the hip flexion angle compared to placing the foot on a higher surface.

Guidelines for arthritis-safe stretching:

  • Warm up the area first with gentle movement or a warm compress
  • Never force a stretch into pain, work at 60-70% of maximum stretch
  • Hold stretches for shorter durations (15-20 seconds) initially
  • Avoid stretches that cause joint pain during or after the stretch
  • Focus on consistency over intensity

If a particular stretch consistently aggravates arthritis symptoms, skip it and focus on the variations that feel manageable. The goal is to maintain available range of motion, not to achieve maximum flexibility.

For additional arthritis-friendly movement options, see our guide to yoga for senior beginners.

Difference Between Static and Dynamic Glute Stretches For Seniors

Static stretches involve holding a position without movement for 20-30 seconds and work best for seniors because they safely lengthen tight muscles without requiring balance or coordination. Dynamic stretches involve controlled movement through a range of motion and are better used as warm-ups before activity rather than for releasing chronic tightness.

Static glute stretches (recommended for most seniors):

  • Figure-4 stretch (seated or supine)
  • Knee-to-chest stretch
  • Piriformis stretch
  • Held for 20-30 seconds, repeated 2-3 times per side
  • Best performed after light activity when muscles are warm
  • Ideal for addressing tightness and improving flexibility

Dynamic glute stretches (use as warm-ups):

  • Leg swings (forward and back, side to side)
  • Walking lunges with a twist
  • Hip circles
  • Performed for 8-12 repetitions per side
  • Best used before walking, exercise, or physical activity
  • Prepare muscles for movement rather than lengthening them

For seniors dealing with tightness, pain, or limited mobility, static stretches should be the primary focus. They’re safer, easier to perform correctly, and more effective for releasing chronic muscle tension. Dynamic stretches can be added once basic flexibility is restored and if you’re preparing for more vigorous activity like balance exercises or walking.

Glute Stretches Seniors Should Avoid

Seniors should avoid glute stretches that require extreme hip flexion, deep squatting, or positions that compromise balance or put excessive stress on the knees and lower back. Some traditional stretches carry unnecessary risk for older adults, especially those with joint issues, balance concerns, or limited flexibility.

Stretches to avoid or modify:

Deep Pigeon Pose: This yoga stretch requires lying face-down with one leg bent underneath the body at an extreme angle. It places significant stress on the knee and hip joint and is difficult to exit safely. Use the seated figure-4 stretch instead, which provides the same muscle release without the joint stress or floor transition.

Standing Figure-4 (unsupported): Balancing on one leg while pulling the other knee toward the chest creates a high fall risk. Always perform this stretch while holding a counter, wall, or sturdy chair for support, or use the seated version instead.

Hurdler Stretch: Sitting on the floor with one leg extended and the other bent back behind the body (like a hurdler position) puts extreme stress on the bent knee and is difficult to get into and out of safely. This stretch offers no advantages over safer alternatives.

Aggressive Bouncing Stretches: Any stretch that involves bouncing or pulsing movements can trigger the muscle’s protective reflex, causing it to tighten rather than lengthen. This approach also increases injury risk. Always stretch smoothly and hold positions steadily.

Warning signs a stretch is inappropriate:

  • Sharp pain in the joint (different from muscle stretch sensation)
  • Inability to breathe normally while holding the position
  • Tingling, numbness, or radiating pain
  • Feeling unstable or at risk of falling
  • Inability to exit the position easily

When in doubt, choose the simplest, most supported version of a stretch. Seated and supine positions are almost always safer than standing or floor-based stretches for seniors.

Glute Stretches That Don’t Require Getting on the Floor

Seniors who cannot get down on the floor or who have difficulty transitioning from floor to standing can effectively stretch their glutes using bed-based and chair-based positions. These alternatives provide equivalent muscle release without the physical challenge of floor transitions.

Bed-based stretches:

Supine Figure-4 on Bed: Lie on your back in bed with knees bent. Cross your right ankle over your left knee and thread your hands through to clasp behind your left thigh. Pull your left thigh toward your chest. This works identically to the floor version but eliminates the need to get up from the floor.

Side-lying Glute Stretch: Lie on your left side in bed with knees bent. Pull your right knee toward your chest while keeping your left leg stationary. This stretches the right glute and is particularly comfortable for those with back issues.

Chair-based stretches:

Seated Figure-4: Described earlier, this is the most versatile no-floor glute stretch. Can be performed in any sturdy chair throughout the day.

Standing Counter Stretch: Stand facing a counter and place your right foot on the counter surface (or on a chair seat if the counter is too high). Lean forward from your hips until you feel a stretch in your right glute. This stretch is accessible for those who can stand but cannot get on the floor.

Bed Edge Stretch: Sit on the edge of your bed with your right ankle crossed over your left knee. Lean forward from your hips while keeping your back straight. The softer surface of the bed makes this more comfortable than a hard chair for some people.

These modifications ensure that mobility limitations don’t prevent you from maintaining glute flexibility. Choose the positions that feel most stable and comfortable for your body.

For more ways to stay active without floor work, explore our standing exercises for seniors.

Do Seniors Need Different Stretches Than Younger People

Seniors need the same basic glute stretches as younger people but should use modified positions that accommodate reduced flexibility, balance concerns, and joint sensitivity. The muscle anatomy and stretching principles remain the same across age groups, but the execution and precautions differ.

Key differences for seniors:

  • Position modifications: Prefer seated and supine positions over standing or deep floor positions
  • Reduced intensity: Work at 60-80% of maximum stretch rather than pushing to the limit
  • Longer warm-up: Spend more time warming muscles before stretching (light movement or warmth)
  • More support: Use chairs, walls, counters, or props for stability during stretches
  • Shorter hold times initially: Start with 15-20 seconds if new to stretching, gradually working up to 30 seconds
  • Greater focus on consistency: Regular, gentle stretching produces better results than occasional aggressive stretching

The stretches themselves, figure-4, knee-to-chest, piriformis stretch, work for all ages. What changes is how you perform them. A 30-year-old might do a figure-4 stretch on the floor without support, while a 70-year-old does the same stretch seated in a chair. Both achieve the same muscle release; the older version simply includes more practical support and safety measures.

Seniors should also pay more attention to how stretches feel during and after. Joint pain (as opposed to muscle stretch sensation) is a signal to modify the position, not push through it. This awareness becomes more important with age as joint changes become more common.

Conclusion

Glute stretches for seniors address a common source of discomfort and limited mobility that develops from prolonged sitting and reduced activity. Tight gluteal muscles contribute to lower back pain, hip stiffness, and difficulty with everyday movements like standing from chairs and walking. Regular stretching, performed 3-5 times per week using seated, standing, or bed-based positions, can produce noticeable improvement within 2-4 weeks.

The most effective approach combines several stretches (figure-4, knee-to-chest, and seated variations) held for 20-30 seconds each, performed when muscles are warm. Seniors with arthritis, balance concerns, or limited mobility should focus on modified positions that provide support and avoid deep joint flexion. Static stretches work better than dynamic movements for releasing chronic tightness.

Next steps:

  1. Choose 2-3 glute stretches from this guide that match your current mobility level
  2. Perform them 3 times this week after light activity or a warm shower
  3. Hold each stretch for 20-30 seconds without forcing or bouncing
  4. Notice how your back, hips, and movement feel after two weeks of consistent practice
  5. Add more stretches or increase frequency if you want faster progress

Consistency matters more than intensity. Even five minutes of gentle stretching several times per week can restore comfort and function to tight glutes, making daily activities easier and more comfortable. For a complete approach to staying mobile and active, combine glute stretching with the simple mobility exercises and healthy habits that support long-term function.


References

[2] Glute Exercises For Seniors The Best Moves To Try And Why Theyre So Good For You – https://www.agebold.com/resources/glute-exercises-for-seniors-the-best-moves-to-try-and-why-theyre-so-good-for-you

[5] At Home Exercises Stretches For Your Glutes – https://shelteringarmsinstitute.com/rehablogs/at-home-exercises-stretches-for-your-glutes/

[7] Stretches For Tight Glutes – https://www.goodrx.com/well-being/movement-exercise/stretches-for-tight-glutes


This article is part of our Stretching & Flexibility Exercises for Seniors series.

Share This Page

Beginner Chair Yoga For Seniors: A Simple Follow-Along Session From Start to Finish

Professional () hero image featuring 'Beginner Chair Yoga For Seniors: A Simple Follow-Along Session' in extra large white

Last updated: June 27, 2026

Quick Answer: This beginner chair yoga session for seniors includes a complete 20-minute routine you can follow from warm-up through cool-down, using only a sturdy chair. Each pose includes hold times and clear instructions for safe practice at home.

Key Takeaways

  • Chair yoga allows seniors to practice yoga safely while seated or using a chair for support
  • A basic session includes 5 minutes of warm-up, 10-12 minutes of main poses, and 3-5 minutes of cool-down
  • Most poses are held for 15-30 seconds with 2-3 repetitions per side
  • You need only a stable, armless chair on a non-slip surface to begin
  • Practice 2-3 times per week for best results in flexibility, balance, and strength
  • Chair yoga is safe for most seniors, including those with arthritis, limited mobility, or balance concerns
  • An 8-week chair yoga program improved functional mobility and strength in older adults according to 2025 research [1]

What Is Chair Yoga and How Does It Differ From Regular Yoga

Chair yoga adapts traditional yoga poses so they can be done while seated in a chair or using a chair for balance support. The main difference from regular yoga is that you don’t need to get down on a floor mat or hold standing balance poses without support.

The practice uses the same breathing techniques and movement principles as traditional yoga but modifies each pose for accessibility. Instead of Downward Dog on the floor, you might do a forward fold while seated. Instead of standing Tree Pose, you practice it while holding the chair back.

Chair yoga maintains the core benefits of regular yogaโ€”improved flexibility, strength, balance, and mental calmโ€”while removing barriers like getting up and down from the floor or requiring significant baseline strength [2]. This makes it practical for people with arthritis, joint replacements, balance issues, or anyone who hasn’t been physically active recently.

For more background on yoga adapted for older adults, see our guide to yoga for senior beginners.

What Is Chair Yoga and How Does It Differ From Regular Yoga

What You Need to Get Started With Chair Yoga at Home

You need a stable chair without wheels, preferably without arms, placed on a surface that won’t slide. A standard dining chair or kitchen chair works well. Avoid office chairs with wheels, folding chairs that might collapse, or chairs with arms that restrict movement.

Essential setup:

  • Chair type: Sturdy, flat seat, no wheels, armless if possible
  • Surface: Non-slip floor or yoga mat under chair legs
  • Space: Enough room to extend arms and legs in all directions (roughly 6 feet by 6 feet)
  • Clothing: Comfortable, non-restrictive clothes and non-slip socks or bare feet
  • Optional: Water bottle within reach, cushion for seat if needed

Place the chair so you have clear space around it. You’ll need room to extend your legs forward, lift your arms overhead, and twist to each side without hitting furniture or walls [7].

Check that the chair height allows your feet to rest flat on the floor with knees at roughly 90 degrees. If your feet don’t reach comfortably, place a folded blanket or yoga block under them.

How Long Should a Beginner Chair Yoga Session Be

A beginner chair yoga session should last 20-30 minutes, including warm-up and cool-down. Start with 15-20 minutes if that feels more manageable, then gradually increase as your comfort and stamina improve.

The session structure breaks down as:

  • Warm-up: 5 minutes of gentle breathing and small movements
  • Main sequence: 10-15 minutes of seated poses
  • Cool-down: 3-5 minutes of relaxation and breathing

Research suggests practicing 2-3 times per week for 20-60 minutes per session provides the best results for strength, balance, and flexibility improvements [7]. Starting with shorter sessions and building up prevents fatigue and reduces injury risk.

For other seated movement options, explore our collection of simple chair exercises for seniors.

Is Chair Yoga Safe for Seniors With Arthritis or Back Pain

Chair yoga is generally safe for seniors with arthritis or back pain because it allows you to control the depth and intensity of each movement. The chair provides support that reduces stress on joints and allows you to stop at any point if discomfort increases.

Safety considerations:

  • Move within a comfortable rangeโ€”stop before pain starts
  • Skip or modify any pose that causes sharp or increasing pain
  • Use the chair back for support during twists and forward folds
  • Keep movements slow and controlled
  • Breathe steadily throughout each pose

Chair yoga can help reduce joint stiffness and back discomfort by gently moving joints through their range of motion and stretching tight muscles [4]. The key is working at your own pace and respecting your body’s current limits.

If you have specific medical conditions, talk to your doctor before starting any new exercise program. Most healthcare providers support chair yoga for seniors because of its low-impact, adaptable nature [5].

The Complete Beginner Chair Yoga Session: Warm-Up (5 Minutes)

Begin each session with gentle movements that prepare your body and focus your attention. Sit toward the front half of the chair with feet flat on the floor, hip-width apart, spine tall but not rigid.

1. Seated Breathing (1 minute)

  • Sit upright with hands resting on thighs
  • Close your eyes or soften your gaze downward
  • Breathe in slowly through your nose for 4 counts
  • Breathe out slowly through your nose for 4 counts
  • Repeat 8-10 times

2. Neck Rolls (1 minute)

  • Drop your right ear toward your right shoulder
  • Roll your chin down toward your chest
  • Continue rolling your left ear toward your left shoulder
  • Roll back through center to starting position
  • Repeat 3-4 times in each direction

3. Shoulder Circles (1 minute)

  • Lift both shoulders up toward your ears
  • Roll them back and down in a circular motion
  • Repeat 8 times backward
  • Then reverse: roll forward and up 8 times

4. Seated Cat-Cow (1 minute)

  • Place hands on thighs
  • Inhale: arch your back gently, lift chest, look slightly up (cow)
  • Exhale: round your back, tuck chin toward chest (cat)
  • Move slowly with your breath
  • Repeat 6-8 times

5. Ankle Circles (1 minute)

  • Lift right foot slightly off floor
  • Rotate ankle in slow circles, 5 times in each direction
  • Return foot to floor
  • Repeat with left foot

The Main Sequence: Beginner Chair Yoga Poses (10-12 Minutes)

This sequence moves through your body systematically, addressing flexibility, strength, and balance. Hold each pose for the time indicated, breathe steadily, and move between poses with control.

1. Seated Mountain Pose (30 seconds)

  • Sit tall with feet flat, hip-width apart
  • Rest hands on thighs, palms down
  • Lengthen spine, relax shoulders down
  • Breathe steadily, feeling grounded and centered

2. Seated Side Stretch (15-20 seconds each side, 2 rounds)

  • Inhale, raise right arm overhead
  • Exhale, lean gently to the left, feeling stretch along right side
  • Keep both sit bones on chair
  • Hold, then return to center
  • Repeat on left side

3. Seated Spinal Twist (20-30 seconds each side)

  • Sit sideways on chair, right hip near chair back
  • Hold chair back with both hands
  • Inhale to lengthen spine
  • Exhale and twist gently to the right, looking over right shoulder
  • Hold, breathing steadily
  • Return to center, switch sides

4. Seated Forward Fold (30 seconds, 2 rounds)

  • Sit toward front of chair, feet flat
  • Inhale, lengthen spine
  • Exhale, hinge forward from hips, letting arms hang toward floor or rest on thighs
  • Keep back relatively straight, don’t force the stretch
  • Hold, then slowly roll up to sitting

5. Seated Warrior (20 seconds each side)

  • Turn to face right side of chair
  • Extend right leg out to side, foot flat on floor
  • Bend left knee, keeping it over ankle
  • Raise arms to shoulder height or overhead if comfortable
  • Hold, feeling strength in legs
  • Return to center, repeat on left side

6. Seated Figure Four Stretch (20-30 seconds each side)

  • Sit upright, feet flat
  • Cross right ankle over left thigh, just above knee
  • Flex right foot to protect knee
  • Gently press right knee down with hand if comfortable
  • Hold, feeling stretch in right hip
  • Release and repeat on left side

7. Seated Eagle Arms (15-20 seconds each side)

  • Extend arms forward at shoulder height
  • Cross right arm over left at elbows
  • Bend elbows, bring palms together if possible (or backs of hands touch)
  • Lift elbows slightly, feeling stretch between shoulder blades
  • Hold, then release and repeat with left arm on top

For additional seated pose variations, check out our guide to yoga poses for senior beginners.

The Main Sequence: Beginner Chair Yoga Poses (10-12 Minutes)

Cool-Down and Relaxation (3-5 Minutes)

The cool-down helps your body transition back to rest and allows you to absorb the benefits of your practice.

1. Seated Hip Circles (1 minute)

  • Hands on thighs
  • Make slow circles with your torso, moving from the hips
  • Circle 4-5 times in each direction
  • Keep movement gentle and controlled

2. Wrist and Finger Stretches (1 minute)

  • Extend right arm forward, palm up
  • Gently pull fingers back with left hand
  • Hold 10 seconds
  • Flip palm down, pull fingers toward you
  • Hold 10 seconds
  • Repeat on left hand

3. Seated Final Relaxation (2-3 minutes)

  • Sit comfortably upright or lean back if chair has a back
  • Rest hands on thighs, palms facing up
  • Close your eyes
  • Breathe naturally, letting your body relax completely
  • Notice any sensations, tension releasing, or calm settling in
  • When ready, slowly open your eyes and move gently

This complete session takes about 20 minutes. As you become familiar with the sequence, you can adjust hold times, add repetitions, or include additional poses from our 10 minute yoga for seniors guide.

How Often Should Seniors Do Chair Yoga Per Week

Seniors should practice chair yoga 2-3 times per week for optimal benefits. This frequency allows your body time to adapt and recover between sessions while providing enough regular movement to improve flexibility, strength, and balance [7].

Weekly schedule options:

  • Beginner: 2 times per week, 20 minutes per session
  • Intermediate: 3 times per week, 25-30 minutes per session
  • Maintenance: 2-3 times per week, 20-30 minutes per session

Space sessions at least one day apart to allow recovery. A Monday-Thursday or Monday-Wednesday-Friday pattern works well for most people.

You can supplement chair yoga with other gentle activities like walking or seated chair exercises on non-yoga days. The goal is consistent, sustainable practice rather than intense, sporadic effort.

Can Chair Yoga Help With Balance and Fall Prevention

Chair yoga can improve balance and reduce fall risk by strengthening the muscles that stabilize your body and improving your awareness of where your body is in space. A 2025 study found that an 8-week chair yoga program improved functional mobility and strength in older adults, as measured by the Tinetti Balance and Gait Assessment [1].

Balance benefits from chair yoga:

  • Strengthens core muscles that support upright posture
  • Improves ankle and hip flexibility, which helps with recovery from stumbles
  • Enhances proprioception (body position awareness)
  • Builds leg strength needed for stable standing and walking
  • Practices weight shifts and controlled movements that translate to daily activities

The chair provides a safe support system while you practice balance-challenging movements. Over time, this builds confidence and physical capability that carries over to everyday situations like reaching for items, walking on uneven surfaces, or catching yourself if you trip [4].

For additional balance work, see our guide to balance exercise for seniors.

Can Chair Yoga Help With Balance and Fall Prevention

Chair Yoga vs Tai Chi for Seniors: Which Is Better

Chair yoga and tai chi both offer balance, flexibility, and mental calm benefits for seniors, but they differ in approach and practical requirements. Neither is universally “better”โ€”the right choice depends on your preferences, physical condition, and what you find sustainable.

Chair yoga advantages:

  • Can be done entirely seated if needed
  • Requires only a chair, no special space
  • Easier to follow along with videos or written instructions
  • More flexibility in session length (can do 10-20 minutes effectively)
  • Better for people with significant balance concerns or mobility limitations

Tai chi advantages:

  • Emphasizes flowing, continuous movement
  • Stronger focus on weight shifting and dynamic balance
  • Often practiced in groups, providing social connection
  • May feel more meditative for some people
  • Builds standing balance more directly

Choose chair yoga if you need seated support, prefer practicing alone at home, or want a practice you can easily modify. Choose tai chi if you can stand comfortably for 20-30 minutes, enjoy group classes, and want to focus specifically on dynamic balance and flowing movement.

Many seniors benefit from doing both at different times or combining elements from each practice.

What Are Common Mistakes Beginners Make Doing Chair Yoga

The most common mistake beginners make is pushing too far into poses, trying to match an instructor’s depth or range of motion rather than working within their own comfortable limits. This can cause strain or injury and makes the practice less sustainable.

Common mistakes and corrections:

  • Holding breath during poses: Breathe steadily throughout each movement
  • Rushing through poses: Move slowly and hold positions for the full time
  • Using an unstable chair: Always use a sturdy, non-wheeled chair on a non-slip surface
  • Forcing stretches: Stop at the first point of gentle tension, not pain
  • Skipping warm-up: Always spend 3-5 minutes preparing your body before main poses
  • Comparing to others: Your practice is individualโ€”focus on your own body’s feedback
  • Inconsistent practice: Sporadic sessions provide minimal benefit; aim for 2-3 times weekly

Another frequent issue is choosing a chair that’s too high or too low, which affects your ability to maintain proper alignment. Your feet should rest flat on the floor with knees at roughly 90 degrees [7].

Can You Do Chair Yoga If You Have Limited Mobility or Injuries

You can do chair yoga with limited mobility or injuries by modifying poses to work within your current range of motion and skipping movements that aggravate specific conditions. Chair yoga’s adaptability makes it accessible for people with various physical limitations [5].

Modifications for common limitations:

  • Shoulder injury: Skip overhead arm raises; keep arms at shoulder height or lower
  • Hip replacement: Avoid crossing legs or deep hip flexion; keep movements gentle
  • Knee problems: Don’t force knee bends; use smaller ranges of motion
  • Wrist pain: Rest hands on thighs instead of bearing weight on hands
  • Limited flexibility: Use a strap or towel to extend reach in forward folds

The chair provides support that allows you to participate in yoga even if standing poses would be unsafe or impossible. You control the depth of every movement and can stop at any point.

If you have recent injuries or ongoing medical conditions, consult your healthcare provider before starting. They can identify specific movements to avoid and confirm that chair yoga is appropriate for your situation.

For additional seated movement options, explore our guide to seated workouts for seniors.

Does Chair Yoga Help With Flexibility and Range of Motion

Chair yoga improves flexibility and range of motion by gently moving joints through their available movement patterns and stretching muscles that have become tight from inactivity or habitual postures. Regular practice can reduce stiffness and make daily movements easier [2].

Flexibility improvements from chair yoga:

  • Increased shoulder mobility for reaching overhead or behind back
  • Better hip flexibility for getting in and out of cars or chairs
  • Improved spinal rotation for looking over shoulder while driving or walking
  • Enhanced ankle mobility for safer walking on varied surfaces
  • Reduced muscle tightness in hamstrings, hips, and back

The key is consistent practice. Flexibility changes happen gradually over weeks and months, not in a single session. Holding stretches for 15-30 seconds and repeating them 2-3 times per week allows connective tissue to adapt and lengthen safely.

Unlike aggressive stretching that can cause injury, chair yoga uses gentle, sustained holds combined with breathing that helps muscles relax into the stretch. This approach is safer and often more effective for older adults.

What Health Benefits Can Seniors Expect From Chair Yoga

Seniors who practice chair yoga regularly can expect improvements in physical function, mental well-being, and overall quality of life. Research and clinical experience show benefits across multiple health dimensions [3][4].

Physical benefits:

  • Improved balance and reduced fall risk
  • Increased flexibility and range of motion
  • Better strength, especially in core and legs
  • Reduced joint stiffness and pain
  • Enhanced breathing capacity

Mental and emotional benefits:

  • Reduced stress and anxiety levels
  • Better sleep quality
  • Improved mood and emotional regulation
  • Enhanced cognitive function and mental clarity
  • Greater sense of calm and well-being [6]

Functional benefits:

  • Easier performance of daily activities (dressing, reaching, bending)
  • More confidence in movement
  • Better posture
  • Reduced chronic pain from arthritis or back problems [4]

These benefits accumulate over time with regular practice. Most people notice improved flexibility and reduced stiffness within 2-4 weeks, while balance and strength improvements become evident after 6-8 weeks of consistent practice [1].

Best Chair Yoga Programs or Classes for Complete Beginners

The best chair yoga program for complete beginners is one that provides clear instruction, appropriate pacing, and modifications for different ability levels. Look for programs specifically designed for seniors or older adults rather than general chair yoga classes.

Program options:

  • Local senior centers: Often offer free or low-cost chair yoga classes with in-person instruction
  • Community recreation departments: Provide group classes at accessible locations
  • Online video platforms: YouTube channels like “Yoga With Adriene” or “SilverSneakers” offer free chair yoga sessions
  • Senior fitness programs: SilverSneakers, Renew Active, and similar programs include chair yoga classes
  • Private instruction: One-on-one sessions with yoga therapists certified in adaptive yoga

When evaluating a program, look for:

  • Instructors with experience teaching seniors
  • Clear demonstration of modifications
  • Appropriate pace (not rushed)
  • Emphasis on safety and individual limits
  • Positive, encouraging atmosphere without pressure

Many people start with online videos to learn basic poses at home, then join group classes for social connection and instructor feedback. Both approaches workโ€”choose what fits your schedule, budget, and learning style.

For additional structured movement routines, see our senior chair exercise routine guide.

Is Chair Yoga Covered by Medicare or Insurance

Chair yoga may be covered by Medicare or private insurance if it’s part of a qualified fitness program like SilverSneakers or Renew Active, but traditional Medicare does not cover standalone yoga classes. Coverage depends on your specific plan and whether the program is classified as preventive care or fitness.

Coverage options:

  • Medicare Advantage plans: Many include fitness benefits that cover chair yoga through programs like SilverSneakers
  • Supplemental insurance: Some Medigap plans offer fitness or wellness benefits
  • Employer retiree plans: May include fitness class coverage
  • Private insurance: Varies widely; check your specific plan benefits
  • Flexible Spending Accounts (FSA) or Health Savings Accounts (HSA): May cover yoga classes prescribed by a doctor for specific conditions

To determine your coverage:

  1. Call your insurance provider and ask about fitness or wellness benefits
  2. Ask if they cover SilverSneakers, Renew Active, or similar programs
  3. Check if chair yoga qualifies under preventive care benefits
  4. Request a list of covered facilities or programs in your area

Even without insurance coverage, many senior centers and community programs offer chair yoga at low cost ($5-15 per class) or free for members.

Can Chair Yoga Be Done in a Wheelchair

Chair yoga can be done in a wheelchair by adapting poses to work within the wheelchair’s structure and your available range of motion. Most seated poses translate directly to wheelchair practice with minor adjustments.

Wheelchair adaptations:

  • Lock wheelchair wheels before beginning
  • Use armrests for support during twists and side bends
  • Modify poses that require feet flat on floor (focus on upper body movements)
  • Adjust forward folds to accommodate wheelchair seat depth
  • Use wheelchair back for support during spinal twists

Poses that work well in wheelchairs:

  • Seated breathing exercises
  • Neck and shoulder stretches
  • Arm circles and shoulder rolls
  • Seated spinal twists (holding armrests)
  • Upper body stretches (side bends, overhead reaches)
  • Wrist and finger stretches
  • Seated cat-cow variations

The same principles apply: move within your comfortable range, breathe steadily, and practice regularly for best results. Many instructors who teach adaptive yoga have specific experience with wheelchair users and can provide personalized guidance.

If you use a wheelchair, look for classes labeled “adaptive yoga” or “accessible yoga” that explicitly welcome wheelchair users. Online videos specifically designed for wheelchair yoga are also available.

Conclusion

Beginner chair yoga for seniors provides a practical, safe way to improve flexibility, balance, strength, and mental calm using only a sturdy chair. This complete 20-minute sessionโ€”from warm-up through cool-downโ€”gives you a structured routine you can follow at home 2-3 times per week.

Start with the poses and hold times outlined here, modifying as needed for your current ability level. Focus on steady breathing, controlled movement, and working within your comfortable range rather than pushing to match any external standard.

Most seniors notice reduced stiffness and improved ease of movement within a few weeks of consistent practice. Balance, strength, and flexibility continue to improve over months of regular sessions.

Next steps:

  1. Set up your practice space with a stable chair on a non-slip surface
  2. Schedule your first sessionโ€”aim for 20 minutes when you won’t be interrupted
  3. Follow the warm-up, main sequence, and cool-down as written
  4. Note how you feel after the session
  5. Schedule your next session 2-3 days later
  6. Consider joining a local class or online program for additional guidance and community

The most important factor is consistency. A simple 20-minute session done regularly provides more benefit than an occasional longer practice. Start where you are, practice at your own pace, and let the benefits accumulate over time.

References

[1] Pmc12591597 – https://pmc.ncbi.nlm.nih.gov/articles/PMC12591597/?utm_source=openai

[2] Chair Yoga For Seniors – https://www.medicalnewstoday.com/articles/chair-yoga-for-seniors?utm_source=openai

[3] Yoga For Everyone – https://www.health.harvard.edu/healthy-aging-and-longevity/yoga-for-everyone?utm_source=openai

[4] The Top 13 Benefits Of Chair Yoga For Seniors – https://www.actsretirement.org/communities/florida/the-terraces-bonita-springs/news-and-videos/the-top-13-benefits-of-chair-yoga-for-seniors/?utm_source=openai

[5] Chair Yoga For Seniors – https://healthanswers.pfizer.com/physical-activity/yoga/chair-yoga-for-seniors?utm_source=openai

[6] Yoga For Seniors – https://www.lifeline.ca/en/resources/yoga-for-seniors/?utm_source=openai

[7] Chair Yoga For Seniors – https://www.lifeextension.com/wellness/fitness/chair-yoga-for-seniors?utm_source=openai


This article is part of our Beginner Exercise Foundations series.

Share This Page

Yoga Poses For Senior Beginners: Simple Standing and Chair Poses

Yoga Poses For Senior Beginners: Simple Standing and Chair Poses

Most adults over 50 can start yoga without ever getting on the floor. Yoga poses for senior beginners using simple standing and chair poses build strength, balance, and flexibility from stable positions that feel manageable from the first session.

This guide covers a practical set of beginner poses that use a chair for support or can be done while seated. The focus is on poses that improve posture, hip mobility, and balance without requiring floor work or advanced flexibility.

Key Takeaways

  • Chair support makes standing poses accessible by providing stability during balance work and transitions
  • Seated poses build flexibility and mobility in the spine, hips, and shoulders without requiring floor positions
  • Simple standing poses improve balance and leg strength when practiced with wall or chair support nearby
  • Most poses take 20-30 seconds and can be practiced individually or combined based on comfort level
  • Safety depends on stable support and staying within a comfortable range of motion
() editorial image showing a senior woman in comfortable athletic wear performing mountain pose (tadasana) next to a sturdy

Standing Poses Using Chair Support

Standing poses build leg strength and balance. Using a chair for support makes these poses stable enough for beginners.

Mountain Pose (Tadasana)

Stand with feet hip-width apart, one hand resting lightly on a chair back. Distribute weight evenly across both feet. Keep knees soft, not locked. Let shoulders relax down and back.

What it does: Improves posture awareness and weight distribution. Serves as a starting position for other standing poses.

How long: Hold for 30-60 seconds while breathing normally.

Chair-Supported Warrior I

Stand facing away from a chair, hands resting on the chair back for support. Step one foot back about two feet. Keep front knee bent at a comfortable angle over the ankle. Back leg stays relatively straight.

What it does: Strengthens front leg, stretches hip flexors, improves balance with support.

How long: Hold 20-30 seconds per side.

Supported Forward Fold

Stand facing a chair seat. Place hands on the chair seat and hinge forward at the hips, keeping back relatively straight. Let the head hang naturally. Knees can stay slightly bent.

What it does: Stretches hamstrings and lower back. Releases tension in the neck and shoulders.

How long: Hold 20-30 seconds, breathing steadily.

Heel-to-Toe Balance Practice

Stand next to a wall or chair back for support. Place one foot directly in front of the other, heel touching toe. Hold the position, using support as needed. Switch feet.

What it does: Challenges balance in a controlled way. Builds confidence for walking and turning.

How long: Hold 10-20 seconds per side, or take 3-5 steps if comfortable.

For more standing movement options, see our guide to standing exercises for seniors.

() image depicting a senior man seated on a sturdy armless chair performing a gentle seated twist, hands positioned on

Chair-Based Yoga Poses For Senior Beginners

Seated poses work on flexibility and mobility without requiring balance or floor positions. Use a sturdy chair without wheels and without arms if possible.

Seated Mountain Pose

Sit toward the front of the chair with feet flat on the floor, hip-width apart. Place hands on thighs. Sit up tall without forcing the spine straight. Relax shoulders down.

What it does: Establishes good seated posture. Serves as a starting point for other seated poses.

How long: Hold for 30-60 seconds while focusing on steady breathing.

Seated Twist

Sit in seated mountain pose. Place right hand on outside of left knee. Place left hand on the chair behind you or on the chair seat. Gently rotate torso to the left. Keep hips facing forward. Repeat on the other side.

What it does: Increases spinal rotation. Releases tension in the mid-back.

How long: Hold 20-30 seconds per side.

Seated Side Stretch

Sit tall in the chair. Raise right arm overhead. Lean gently to the left, feeling a stretch along the right side. Keep both hips on the chair. Repeat on the other side.

What it does: Stretches the sides of the torso and shoulders. Improves side-to-side flexibility.

How long: Hold 15-20 seconds per side.

Seated Forward Fold

Sit toward the front of the chair with feet flat. Hinge forward at the hips, letting the torso fold over the thighs. Arms can hang down or rest on thighs. Keep the fold gentle and comfortable.

What it does: Stretches the lower back and hamstrings. Releases tension in the neck.

How long: Hold 20-30 seconds.

Ankle Circles

Sit tall in the chair. Lift one foot slightly off the floor. Rotate the ankle slowly in one direction, then the other. Repeat with the other foot.

What it does: Improves ankle mobility and circulation in the lower legs.

How long: 5-10 circles in each direction per foot.

For additional seated movement options, see our article on simple chair exercises for seniors.

() editorial photograph showing a senior woman in a supported standing forward fold position, hands resting on chair seat,

How to Practice These Poses Safely

Yoga poses for senior beginners work best when practiced with attention to stability and comfort. Here’s how to set up a safe practice.

Use Stable Support

  • Choose a sturdy chair without wheels
  • Place the chair on a non-slip surface or against a wall
  • Keep a wall within arm’s reach during standing poses
  • Test the chair’s stability before relying on it for balance

Stay Within Comfortable Range

  • Move slowly into each pose
  • Stop at the point where you feel a gentle stretch, not pain
  • Keep breathing steady and natural throughout
  • Skip any pose that feels unstable or uncomfortable

Practice Controlled Transitions

  • Move between poses slowly and deliberately
  • Use chair or wall support when changing positions
  • Take a breath or two between poses if needed
  • Sit down immediately if you feel unsteady

Start With Short Sessions

Begin with 5-10 minutes and 3-5 poses. Add more poses or hold times as comfort increases. Practicing 3-4 times per week builds familiarity without overloading joints or muscles.

For guidance on starting any new movement practice, see our article on how to start exercising for seniors.

Common Questions About Yoga Poses For Senior Beginners

Do I need a yoga mat?
Not for these poses. A sturdy chair and non-slip floor surface are sufficient. A mat can be used under the chair for extra grip if the floor is slippery.

How often should I practice?
Three to four times per week allows time for practice and recovery. Daily practice is fine if poses feel comfortable and don’t cause soreness.

What if I can’t reach as far as shown?
Work within your current range. Flexibility improves gradually with regular practice. Using props like a strap or towel can help bridge the gap in reaching poses.

Should I feel sore after practicing?
Mild muscle awareness is normal when starting. Sharp pain, joint discomfort, or soreness lasting more than a day means the pose was too deep or held too long.

Can I combine these with other exercises?
Yes. These poses work well alongside balance exercises or strength exercises. Practice yoga on different days or after other exercise sessions.

Building a Simple Practice Routine

These poses can be practiced individually or combined into a short sequence. A basic routine might include:

  1. Seated mountain pose (1 minute)
  2. Seated twist (30 seconds each side)
  3. Seated side stretch (20 seconds each side)
  4. Mountain pose with chair support (30 seconds)
  5. Supported forward fold (30 seconds)
  6. Heel-to-toe balance practice (20 seconds each side)

This takes about 6-8 minutes. Add or remove poses based on time and comfort level.

For more beginner-friendly yoga options, see our guide to beginner yoga for seniors.

Conclusion

Yoga poses for senior beginners using simple standing and chair poses provide practical ways to improve flexibility, balance, and strength from stable positions. These poses require minimal equipment and can be practiced at home with a sturdy chair and clear space.

Start with 3-5 poses that feel manageable. Practice 3-4 times per week. Use chair or wall support whenever needed. Stay within a comfortable range of motion and move slowly between poses.

Most adults over 50 can begin practicing these poses immediately. The key is using adequate support and working within current ability rather than pushing toward an ideal position.


This article is part of our Beginner Exercise Foundations series.

Share This Page

Yoga For Senior Beginners: Simple Starter Practice

Yoga For Senior Beginners

Most adults over 50 who consider yoga assume they need prior flexibility or special equipment. Neither is true. Yoga for senior beginners works with the body as it is, using simple movements that support balance, joint mobility, and breathing control without requiring floor work or complicated positions.

This guide explains what yoga for senior beginners involves, what to prepare, and how to begin a short, practical sequence at home or in a beginner class.

Key Takeaways

  • Yoga for senior beginners focuses on supported movements, breathing, and comfortable range of motion rather than flexibility goals
  • A chair, wall, or countertop provides stability for standing poses and helps with safe transitions
  • A basic starter practice includes seated posture work, gentle reaching, simple spinal movement, and supported balance
  • Sessions can start at 10โ€“15 minutes and build gradually based on comfort and response
  • Stop for sharp pain, dizziness, or shortness of breath, and move within a range that feels stable

What Yoga For Senior Beginners Includes

Yoga for senior beginners uses slow, controlled movements combined with steady breathing. The practice emphasizes posture, balance, and joint mobility rather than deep stretching or advanced poses.

Core elements:

  • Seated work: posture alignment, gentle twists, and shoulder or neck movement while sitting in a chair
  • Supported standing: balance poses using a chair back or wall for stability
  • Breathing focus: slow, even inhales and exhales coordinated with movement
  • Gentle transitions: moving between positions without rushing or sudden shifts

The practice does not require getting onto the floor. Chair-based and standing options allow older adults to participate without strain. For those interested in a broader introduction to starting movement after a long break, how to start exercising for seniors covers safe first steps.

Getting Ready: What a Beginner Needs

() editorial image showing essential yoga starter items arranged neatly on light wooden surface: rolled yoga mat in neutral

Yoga for senior beginners requires minimal equipment. Most items are already available at home.

Basic setup:

  • Sturdy chair: one without wheels, with a straight back and stable base
  • Comfortable clothing: loose or stretchy pants and a shirt that allows shoulder movement
  • Flat, non-slip surface: a yoga mat, carpet, or any stable floor area
  • Wall or countertop: for additional support during standing poses
  • Water nearby: to sip between movements

Shoes are optional. Bare feet or non-slip socks work well. Avoid thick-soled shoes that reduce balance feedback.

Class or home practice:

Beginner yoga classes designed for seniors provide guided instruction and group pacing. Many community centers, senior centers, and studios offer chair yoga or gentle yoga sessions. Home practice allows flexibility in timing and pace. Online videos or printed guides can support home sessions, though initial instruction from a qualified teacher helps establish safe form.

A Simple Starter Sequence for Yoga for Senior Beginners

This short sequence introduces basic movements in a safe order. Each position should feel stable and controlled. Hold each pose for 3โ€“5 slow breaths unless otherwise noted.

1. Seated posture (chair)

Sit toward the front edge of the chair with feet flat on the floor, hip-width apart. Rest hands on thighs. Lengthen the spine without forcing an arch. Relax shoulders down and back. Breathe slowly and evenly for 5โ€“6 breaths.

2. Seated side reach

From seated posture, place the right hand on the chair seat beside the hip. Inhale and reach the left arm up and over to the right, creating a gentle side bend. Keep both hips on the chair. Hold for 3 breaths, then return to center. Repeat on the opposite side.

3. Seated spinal twist

Sit upright in the chair. Place the right hand on the outside of the left knee and the left hand on the chair back or armrest. Inhale to lengthen the spine, then exhale and gently twist to the left. Keep both hips facing forward. Hold for 3 breaths, return to center, and repeat on the opposite side.

4. Supported standing balance

Stand beside the chair with the right hand resting lightly on the chair back. Feet should be hip-width apart. Shift weight onto the left foot and slowly lift the right foot a few inches off the floor. Hold for 3โ€“5 breaths, then lower. Repeat on the opposite side. This movement supports everyday balance and can be expanded with other balance exercises for seniors.

5. Standing forward fold (supported)

Stand facing the chair with both hands resting on the chair back. Step back so the arms are extended. Hinge forward at the hips, keeping the back flat and knees slightly bent. Let the head hang naturally. Hold for 3โ€“5 breaths, then walk the feet forward and return to standing.

6. Gentle standing side bend

Stand with feet hip-width apart, chair nearby for support if needed. Place the right hand on the right hip. Inhale and reach the left arm up, then exhale and bend gently to the right. Hold for 3 breaths, return to center, and repeat on the opposite side.

7. Seated rest

Sit back in the chair with hands resting on thighs. Close the eyes or soften the gaze. Breathe slowly and evenly for 5โ€“6 breaths.

This sequence takes 10โ€“15 minutes. Repeat 2โ€“3 times per week to start, adding sessions as comfort improves.

How to Practice Safely

() demonstration image showing simple seated yoga position from side angle: mature adult sitting upright on front edge of

Safety in yoga for senior beginners depends on pacing, support, and attention to body signals.

Key safety points:

  • Use support: keep a chair, wall, or countertop within reach during standing poses
  • Move slowly: avoid quick transitions or sudden shifts in position
  • Stay within comfortable range: stretch or reach only as far as feels stable, not to the point of strain
  • Breathe steadily: hold the breath signals tension; keep breathing slow and even
  • Stop for pain: sharp pain, dizziness, or shortness of breath means stop and rest

Common adjustments:

  • Tight hips or knees: sit fully in the chair rather than perching on the edge
  • Limited shoulder mobility: reduce the height of arm reaches or skip overhead movements
  • Balance concerns: keep both hands on the chair back during standing poses

For those who prefer seated movement throughout the session, chair exercises for seniors offer additional options.

Building a Routine

Consistency matters more than session length. A short practice done regularly provides more benefit than occasional longer sessions.

Suggested schedule:

  • Week 1โ€“2: 10 minutes, 2 times per week
  • Week 3โ€“4: 15 minutes, 2โ€“3 times per week
  • Week 5+: 15โ€“20 minutes, 3 times per week

Add variety by rotating through different sequences or incorporating other gentle exercises for seniors. Yoga pairs well with walking, strength work, or other low-impact activities.

When to Seek Guidance

A qualified yoga instructor can provide personalized adjustments and answer questions about form. Look for instructors with training in senior yoga, adaptive yoga, or chair yoga. Many offer private sessions or small group classes.

Situations that benefit from direct instruction:

  • Starting yoga after a fall, surgery, or injury
  • Managing arthritis, osteoporosis, or chronic pain
  • Uncertainty about proper alignment or breathing technique
  • Interest in progressing to more varied poses

Community centers and senior centers often provide affordable beginner classes. Online platforms offer live or recorded sessions, though in-person guidance helps establish safe habits early.

Conclusion

Yoga for senior beginners offers a practical way to support balance, joint mobility, and breathing control through simple, supported movements. The practice does not require prior flexibility, floor work, or special equipment beyond a sturdy chair and comfortable clothing.

Start with the basic sequence provided, moving slowly and using support as needed. Practice 2โ€“3 times per week, gradually increasing session length as comfort improves. Stop for sharp pain or dizziness, and adjust movements to match current ability rather than forcing a specific range.

Consistency builds familiarity and confidence. Over time, the movements become easier and the benefits more noticeable in everyday tasks that require balance, reaching, or bending.


This article is part of our Beginner Exercise Foundations series.

Share This Page